
)


)

At TrueLayer, we’ve been opening up finance since 2017. We handle over half of all PIS transactions in the UK, and have initiated over a billion open banking payments since we launched. In the process, we’ve learned a thing or two about what drives your users to choose new payment methods and adopt open banking.
Before we get started, let’s clarify a few of the things we talk about in this article.
PIS deposit, open banking deposit, open banking top-up?
All of these terms refer to the same thing: the process a user goes through to top up a digital wallet or their account via open banking — in other words, how they make a deposit to your app.
What industries is this useful for?
Open banking deposits are a common use case in wealthtech, iGaming, digital banking and personal finance management.
What results can you expect to see by following the suggestions in this guide?
Client implementations have seen an increase of up to 15% in open banking adoption, and up to 10% in overall conversion rate in the first months after following our suggestions.
In this article we deep dive on how to improve the open banking payment experience in your app so that your users can deposit funds without breaking a sweat. We cover:
Introducing instant bank transfers to your users
Creating the best UX for first-time users
Optimising for returning users
Keeping your flow compliant
If you’ve already read our previous guides on increasing open banking adoption and optimising the user journey, let’s get to it.
📥 Too much reading? Download our visual guides instead:
Introducing instant bank transfers to your users
First things first: what is an 'open banking deposit'?
The part of your app flow, from the moment a user chooses to deposit funds with open banking, until the funds arrive in their account. We recommend calling them ‘instant bank transfers’ to your users.

)
Where to introduce it in your app
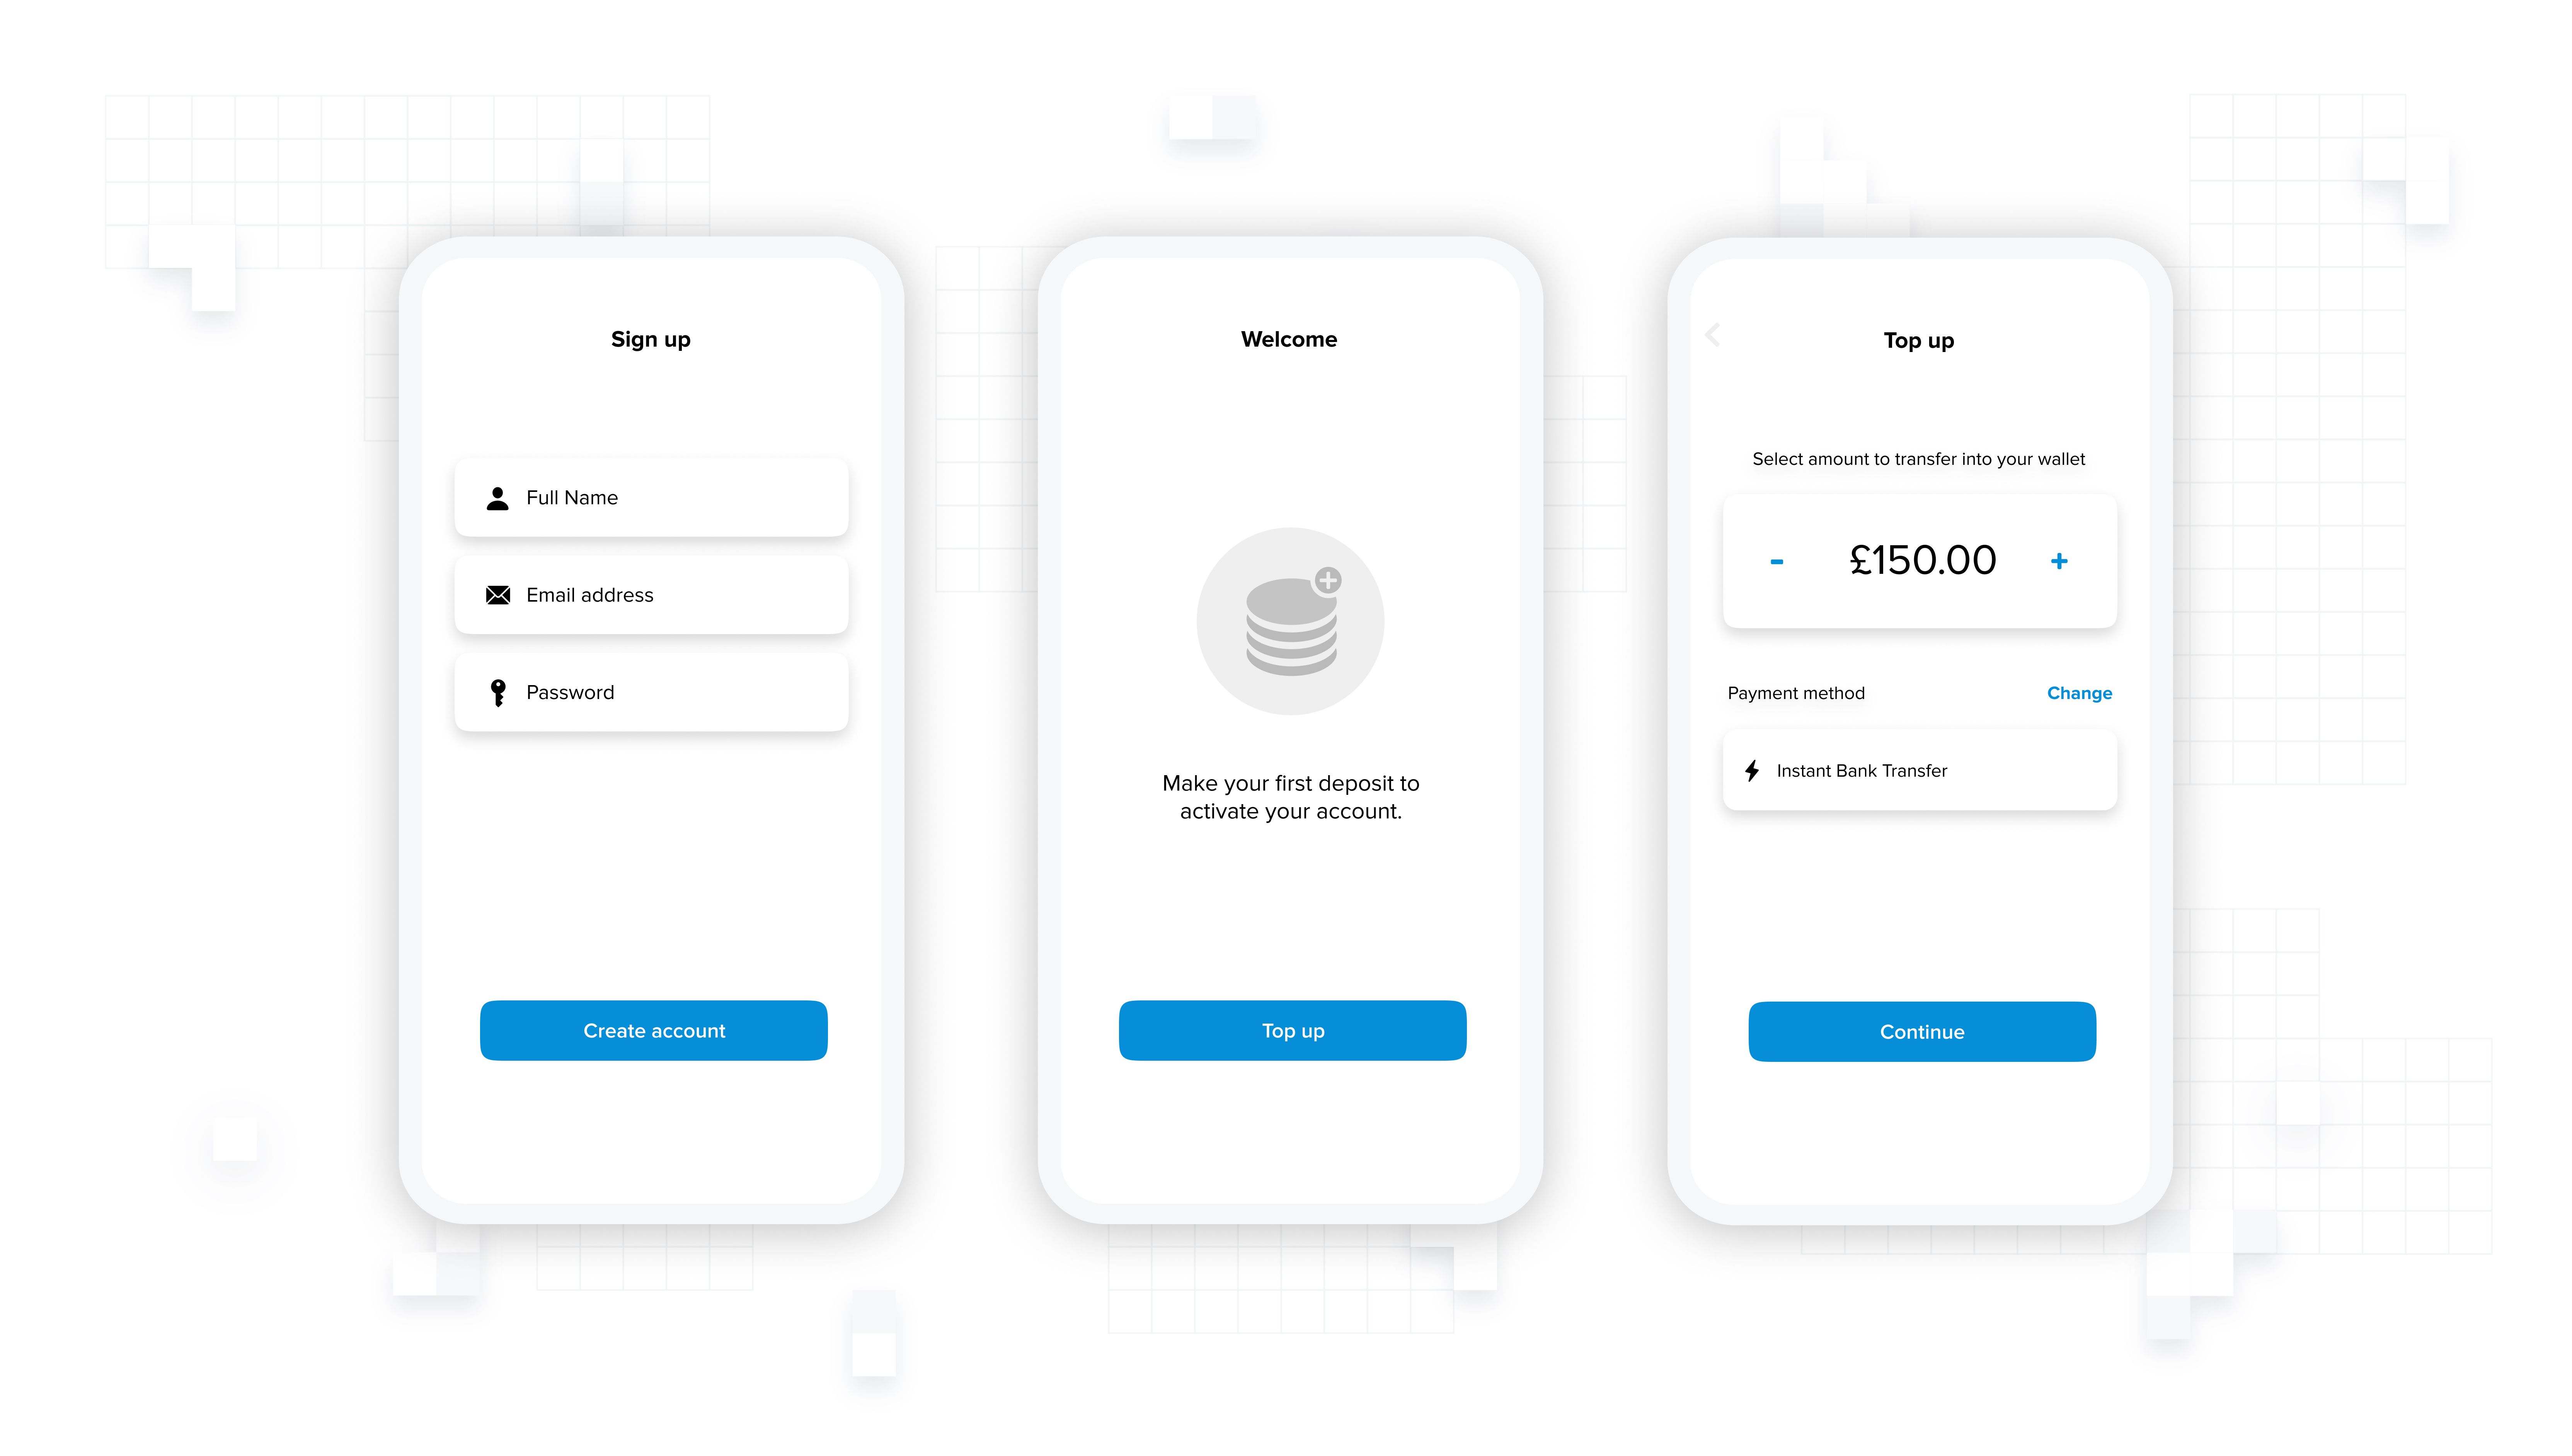
A common place to introduce open banking deposits is from the home screen of your app, once a user has already activated their account. But depending on your use case there may be an opportunity to introduce open banking even earlier.
Wealthtech, iGaming and digital banking apps often require new users to activate their account by making a deposit. This is the perfect place to familiarise your user with open banking as soon as they start using your service, for two good reasons:
Open banking is instant and means your user can start using your app straight away
It builds all-important trust for future open banking deposits

)
Promoting open banking as a new payment method
If your app allows for it, an existing user has likely already set a default payment method which they’ll use without a second thought. So how do you draw their attention to a new and improved option?
The answer here is simple: create more entry points.
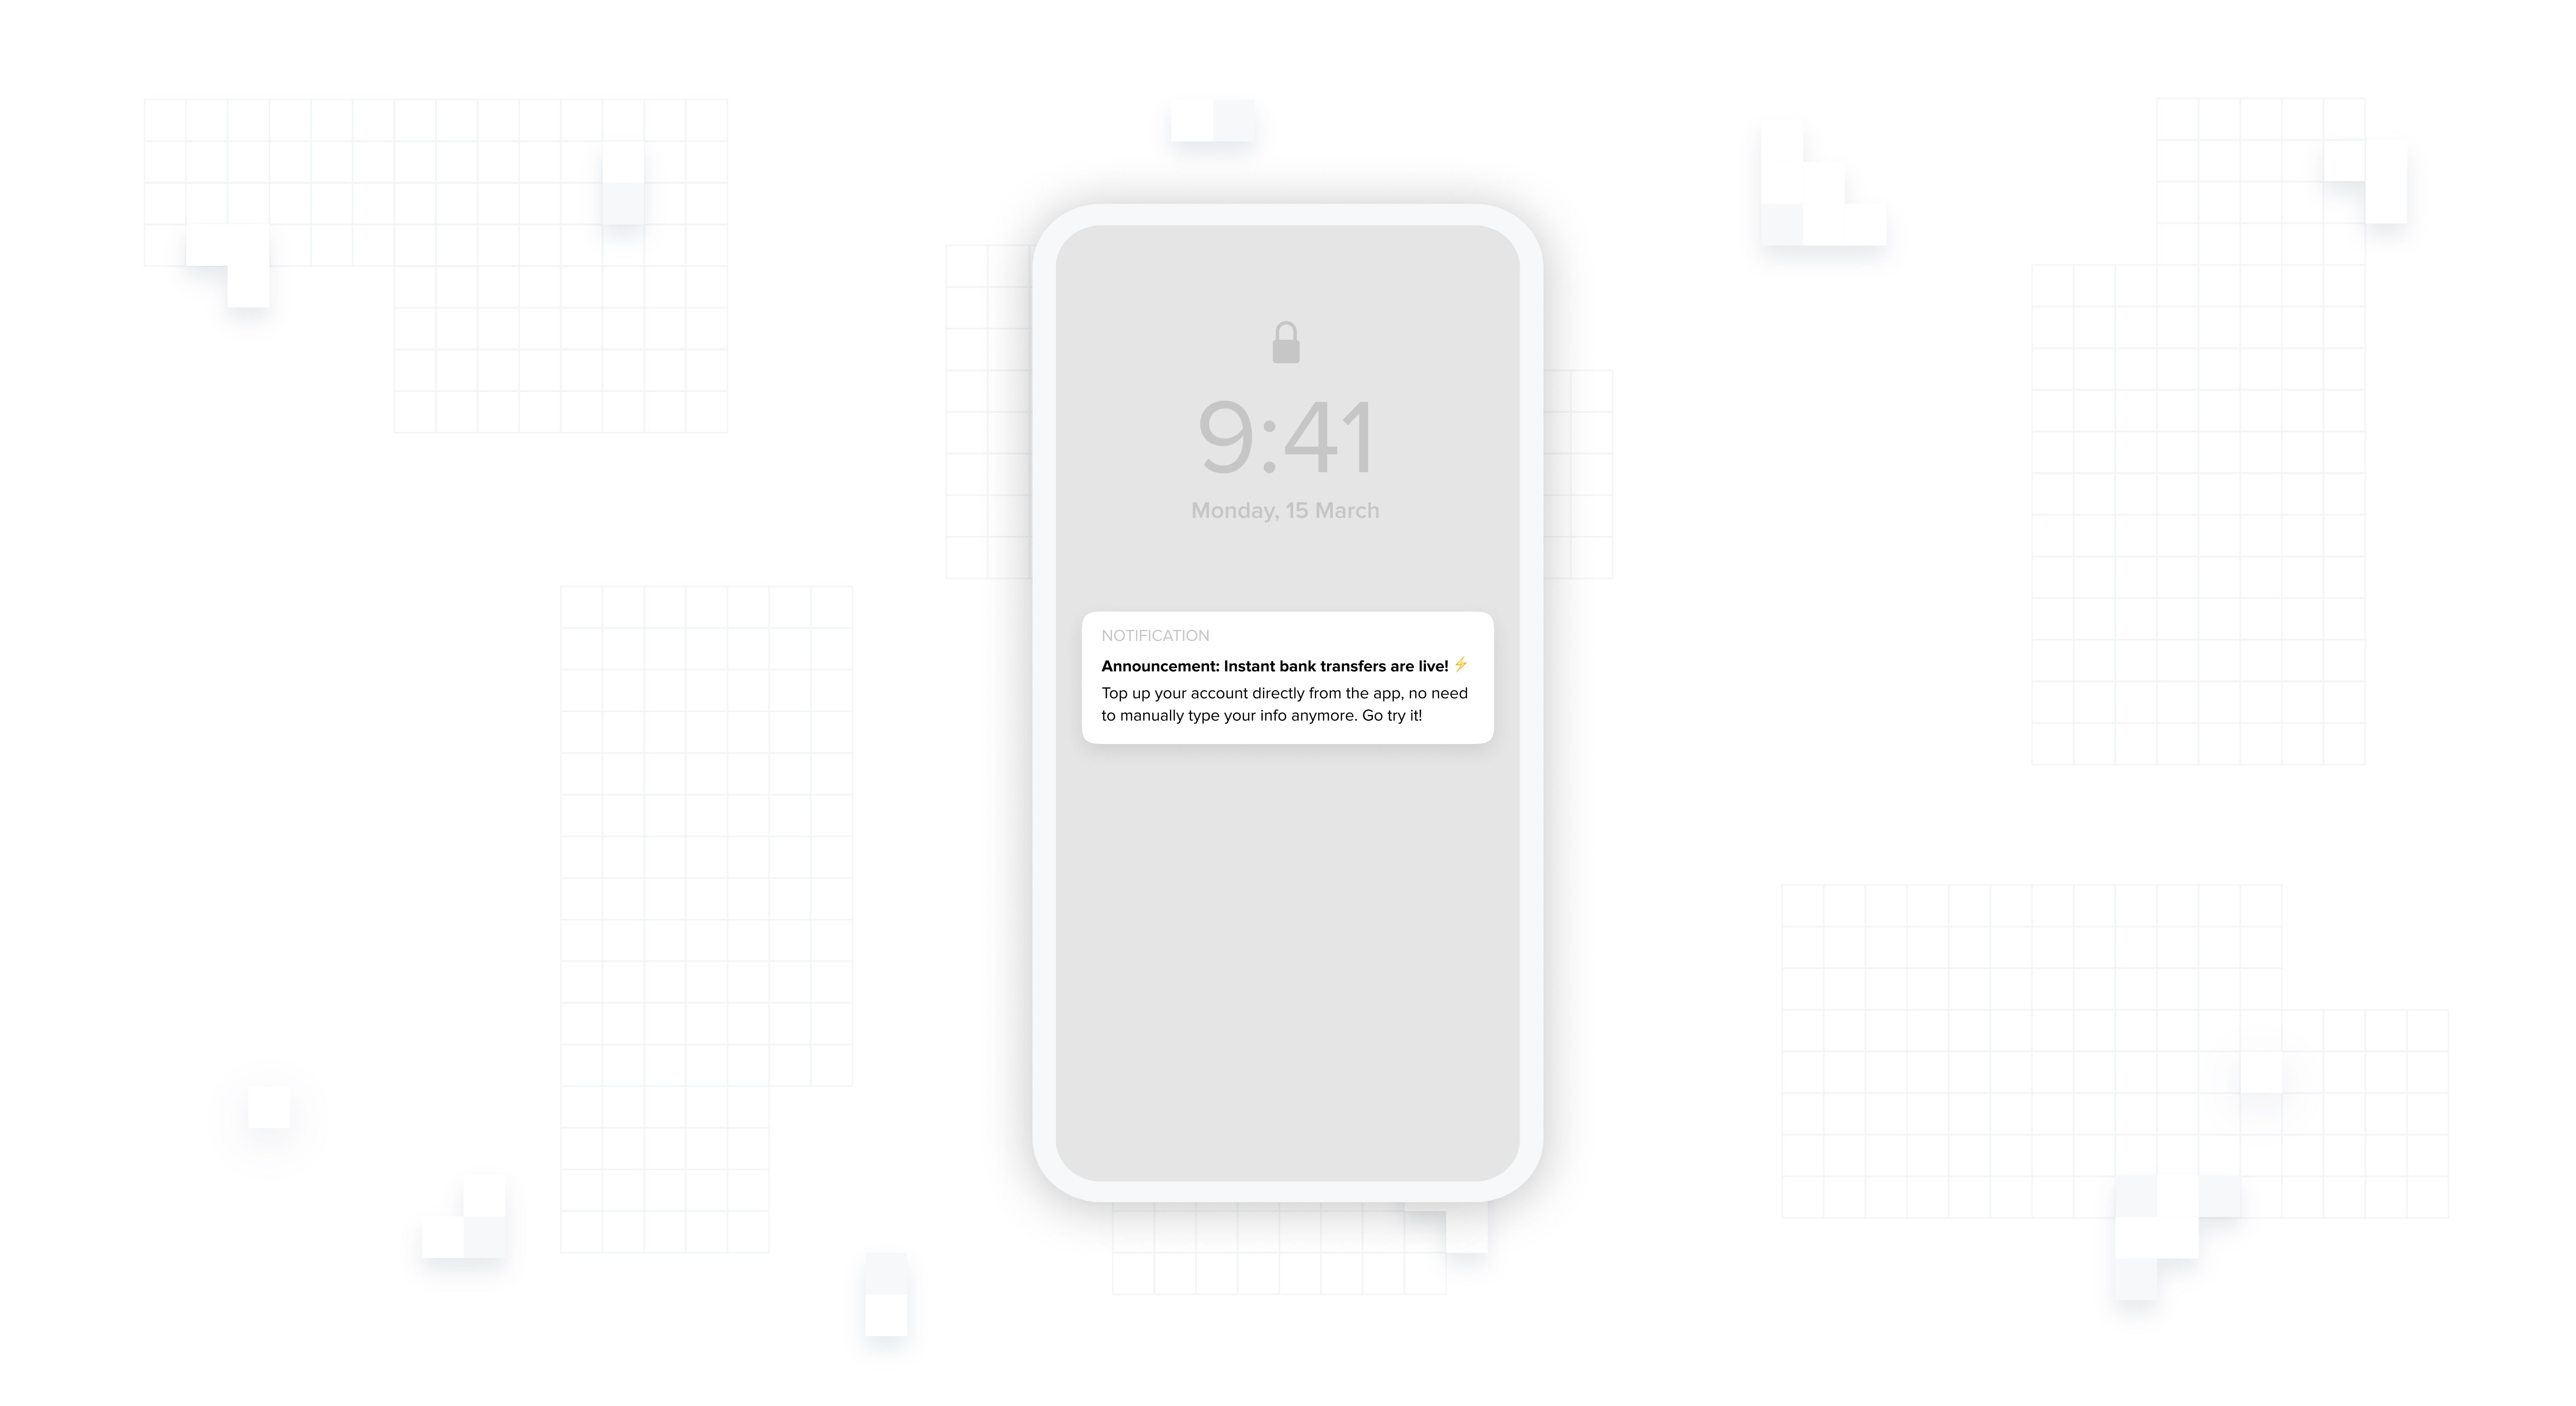
General announcements
System banners and push notifications are effective ways of letting your users know about open banking deposits. Alternatively, you could run an email campaign and create social shout-outs. You know best what channels work for your users, just make sure to get the message out there: open banking is here — and it’s instant, secure, fee-less and really easy to use.

)
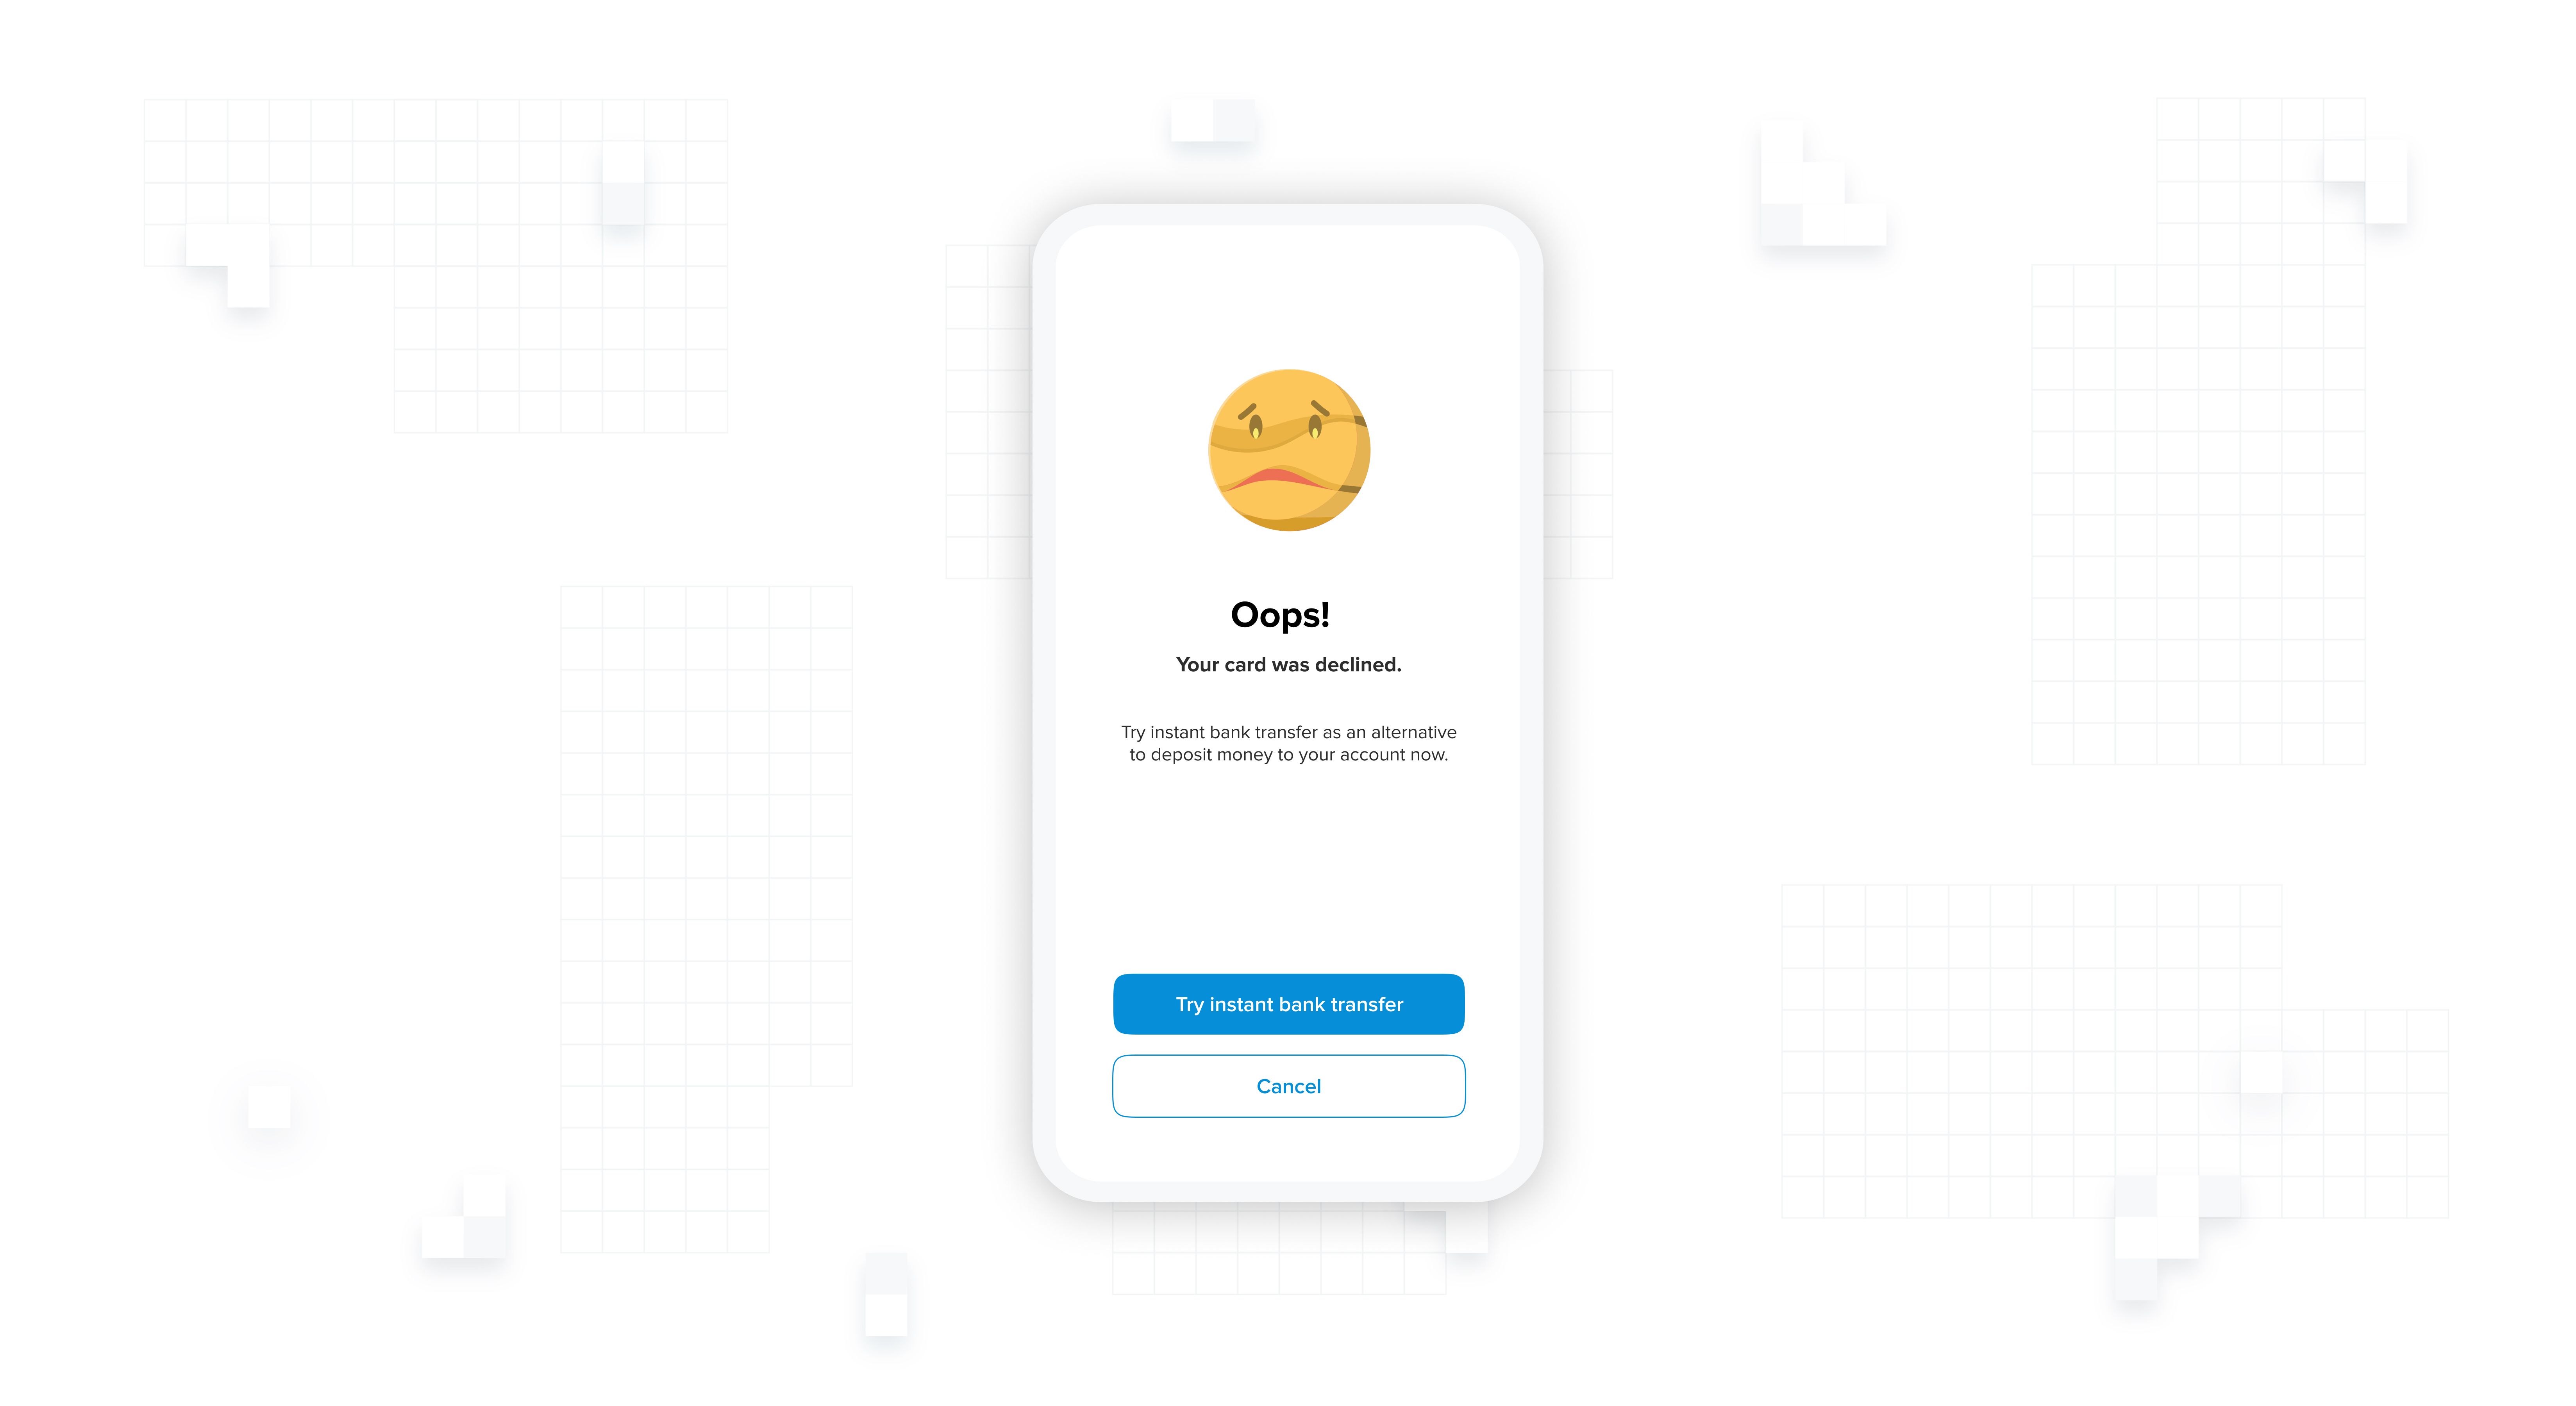
Errors and failures in other methods
When your user’s attempts to make a deposit with a different payment method fail, don’t just display an error message. Provide them with an alternative method in instant bank transfers.
)
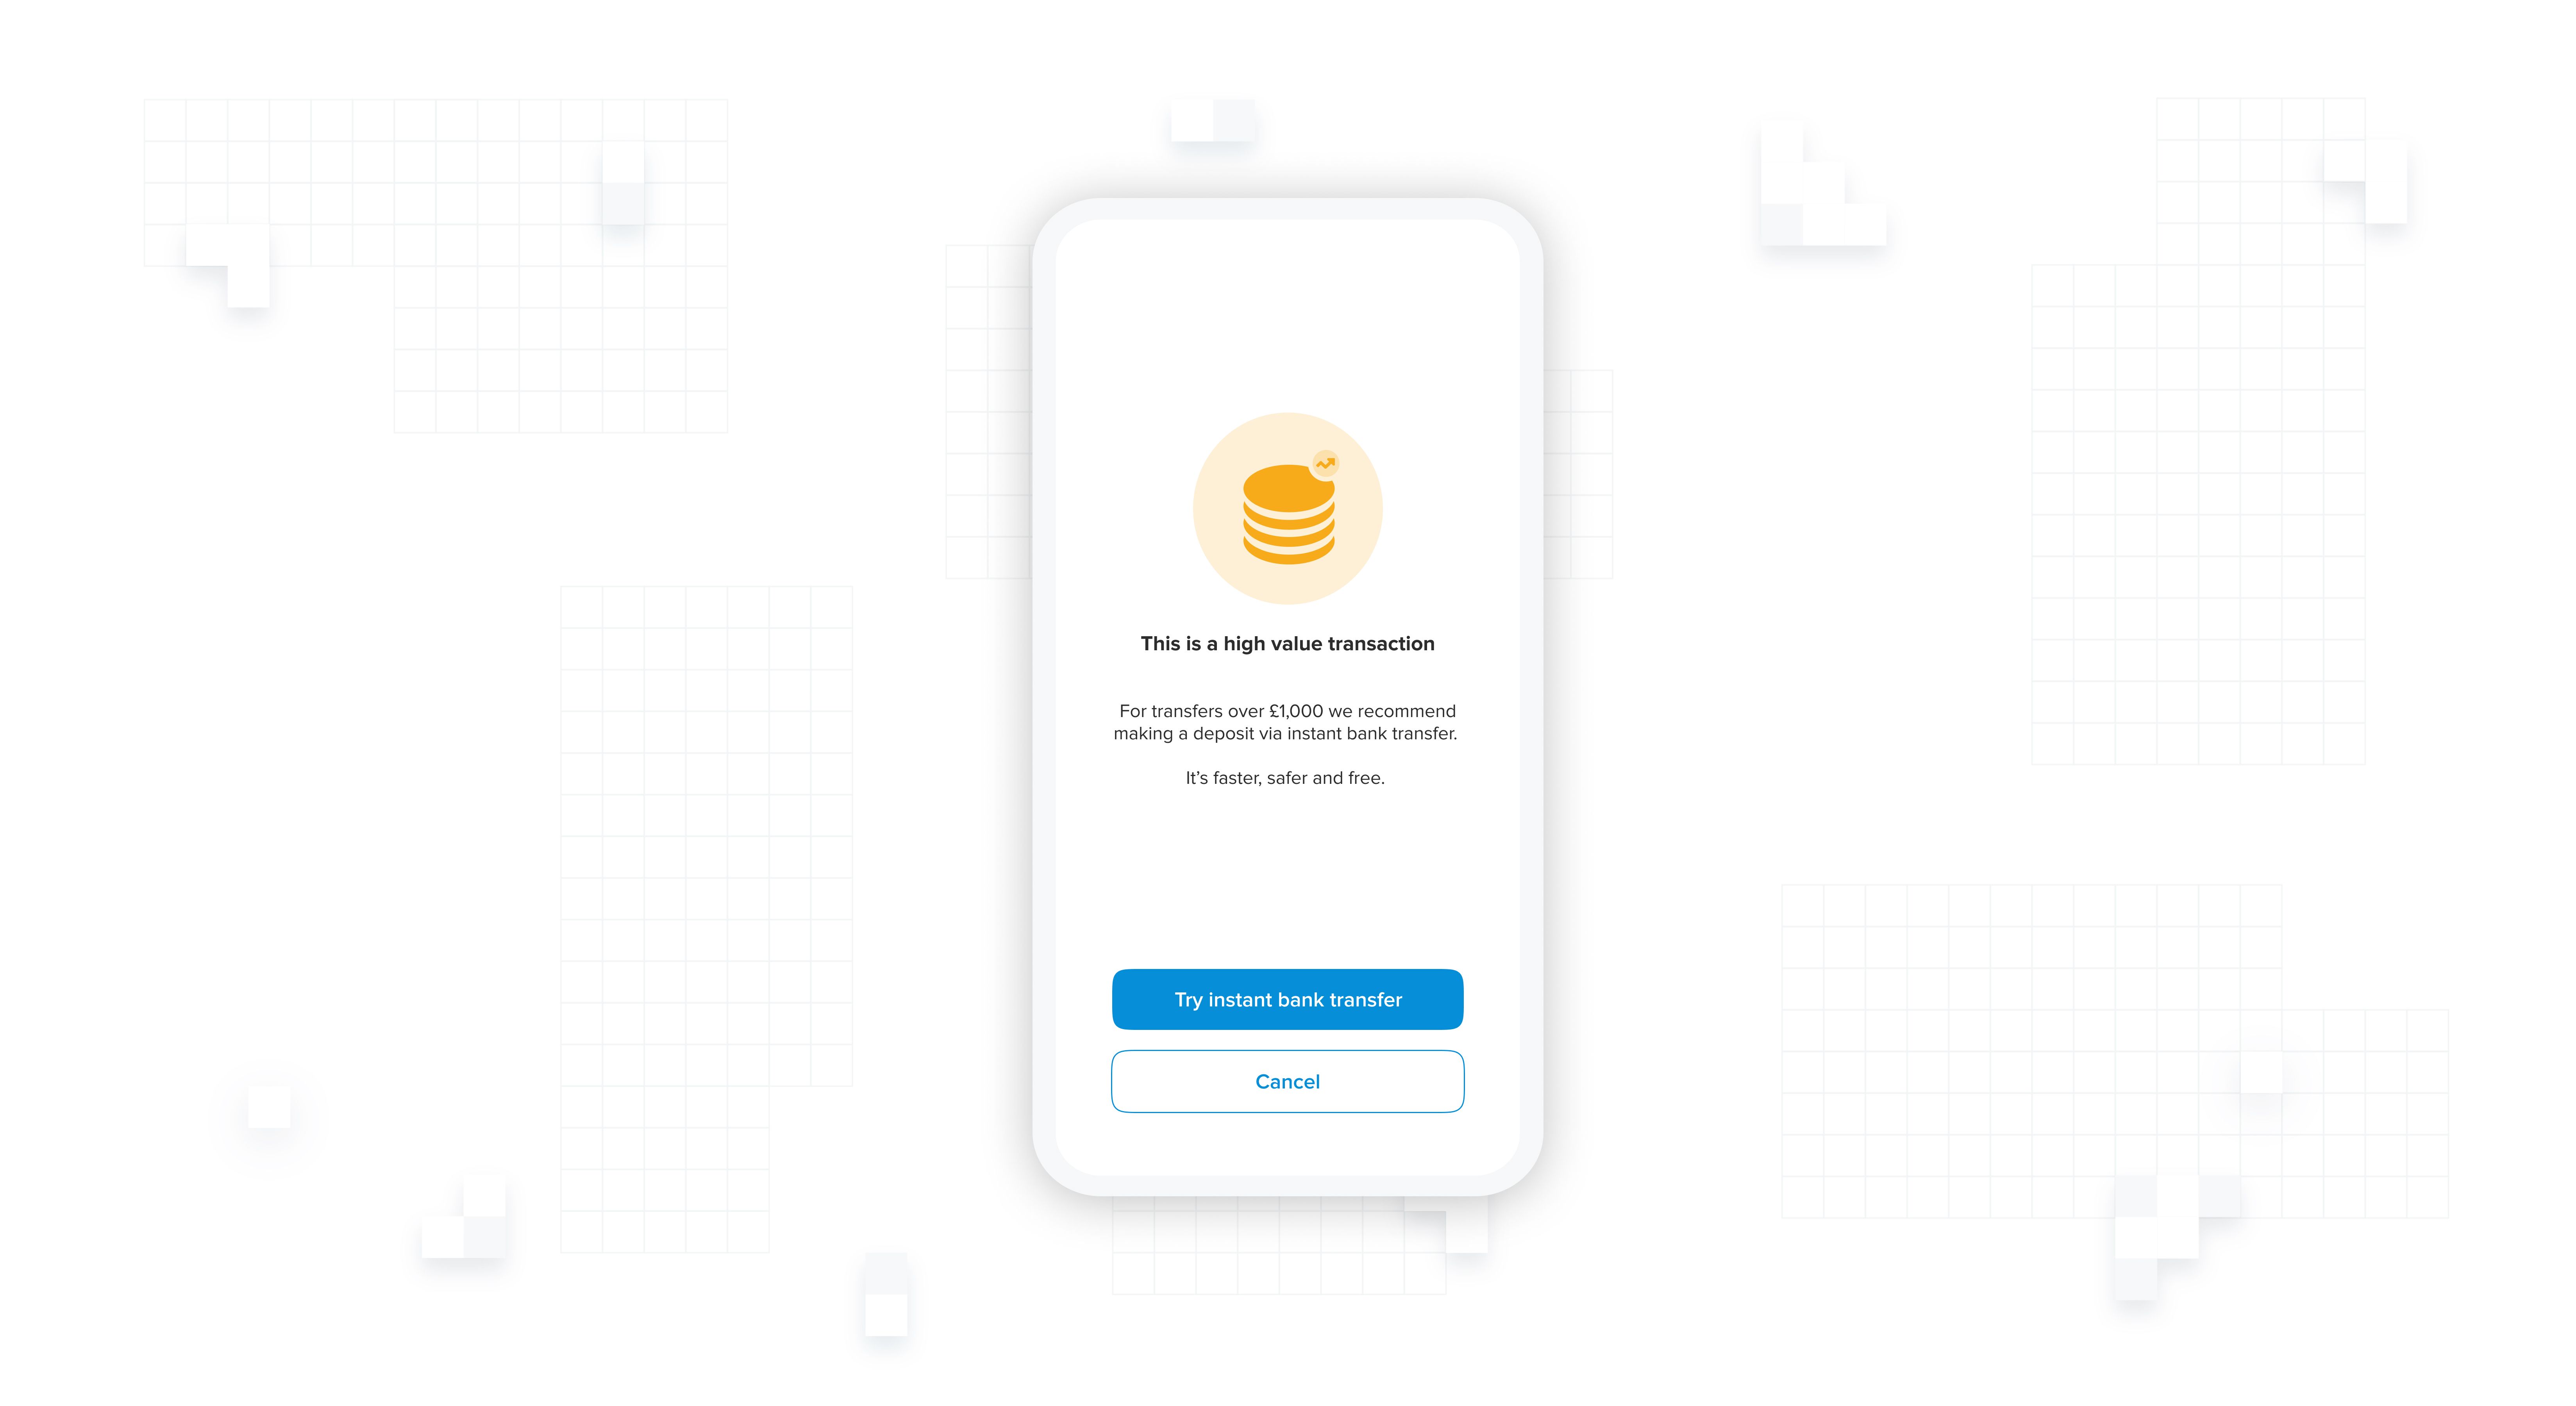
High value transactions
Security is one of the main the concerns when it comes to moving money — and that concern is 10x’d for high value deposits. Consider recommending instant bank transfer as the safer and more convenient option for deposits over a certain threshold.
)
Following these tips, you should see more and more users making their first deposit with open banking. Next, let’s see how we can improve the flow’s conversion rate and create the best user experience.
Creating the best UX for first-time users
Users making an open banking deposit for the first time require a different approach compared to someone who’s done it before. And the numbers back this up: returning users are 20% more likely to choose open banking compared to first-timers. They trust it because they’ve already used it.
On the other hand, new users need a few more nudges to increase their trust and confidence before they commit to open banking as an option.
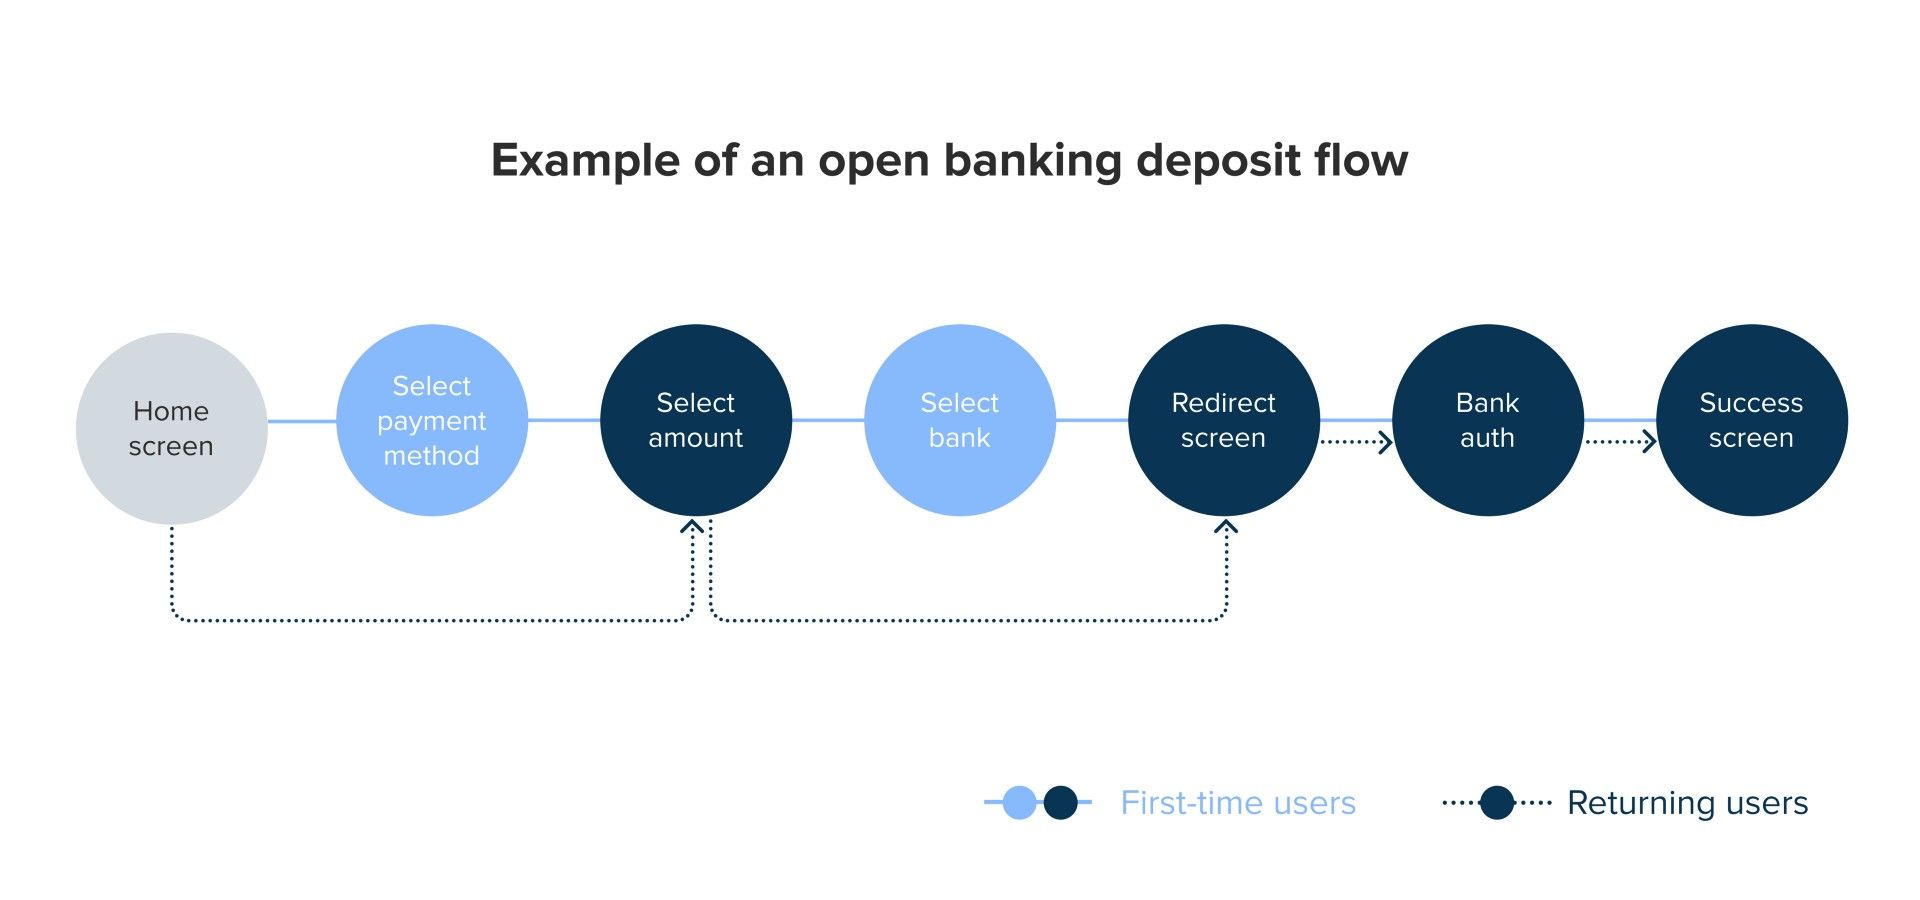
So, let’s look at the best UX practices for every screen a first-time user encounters

)
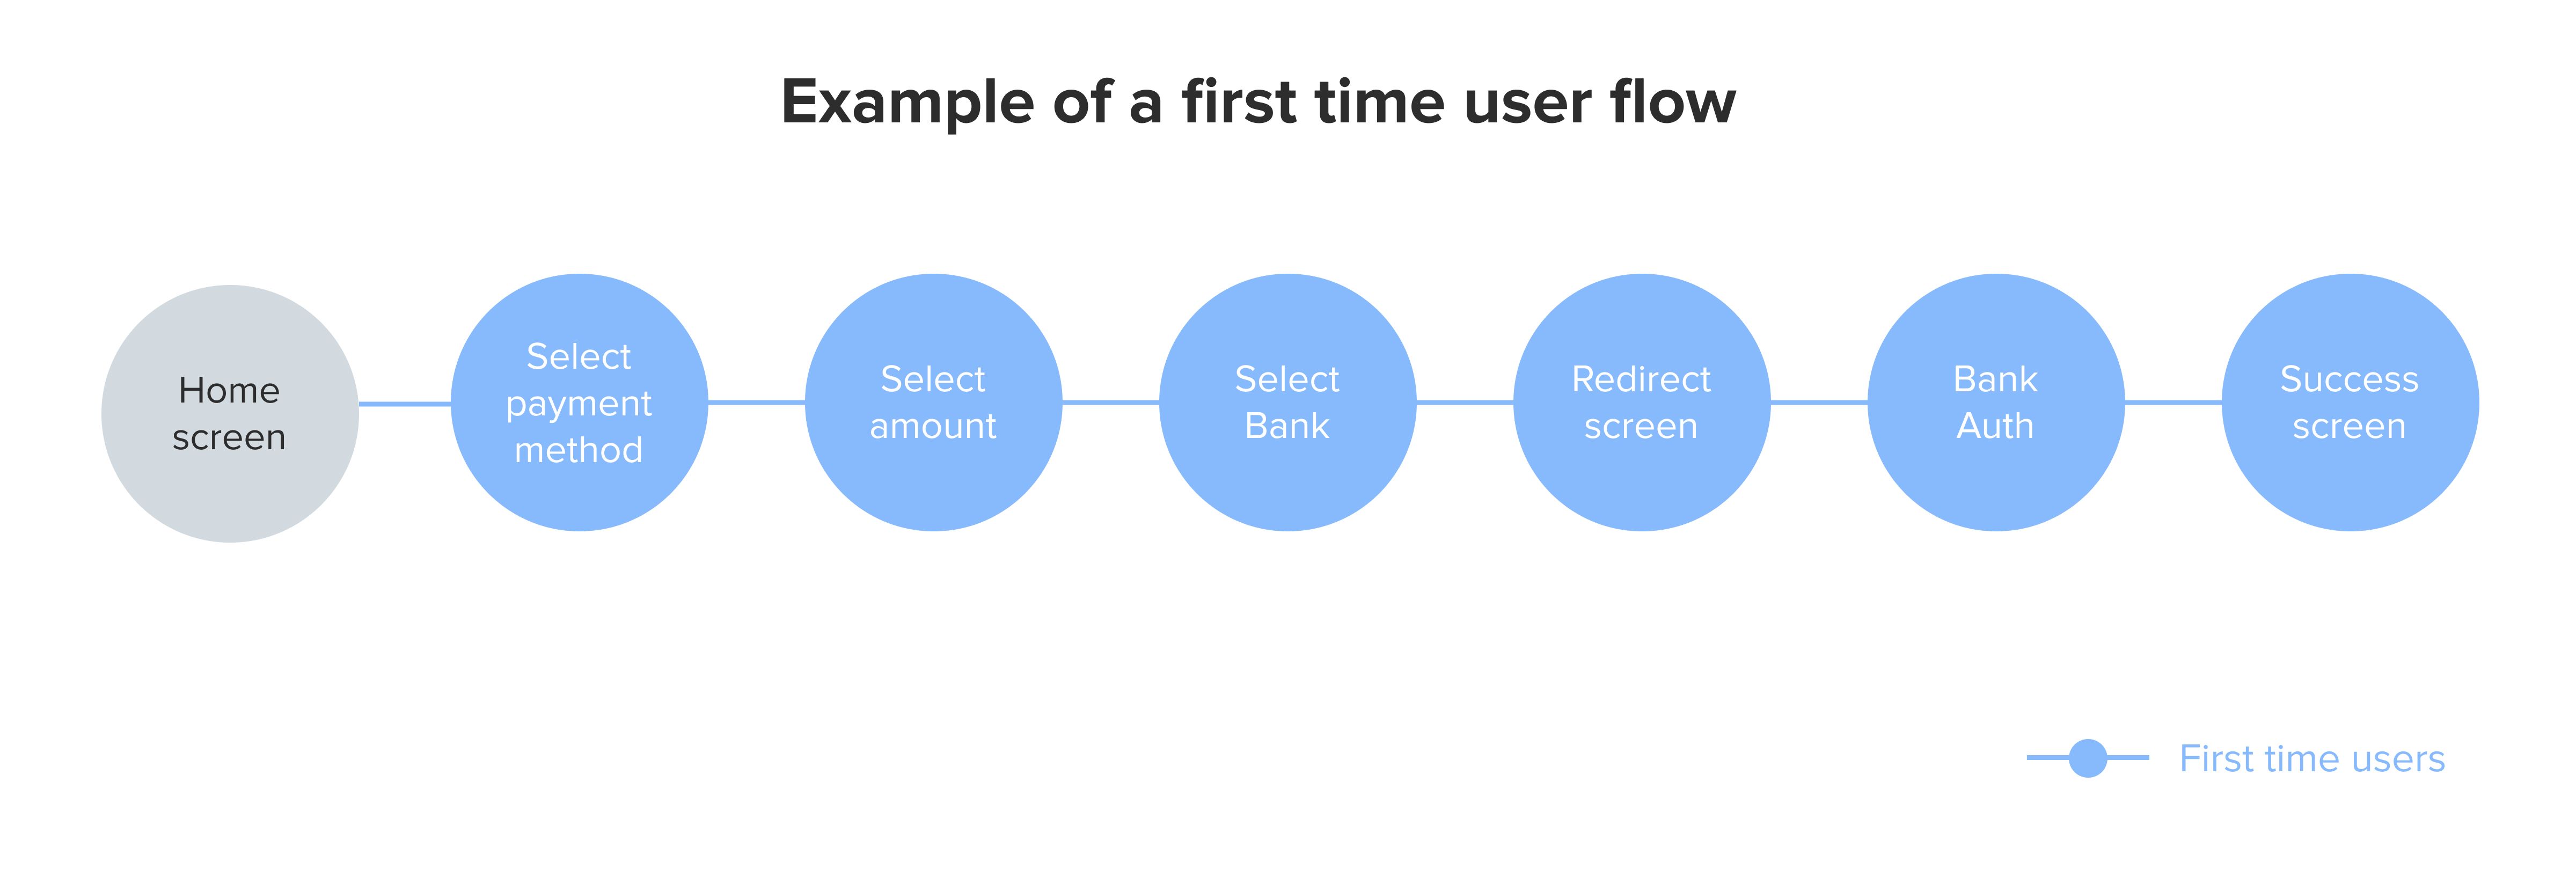
1. Payment method selection screen
The payment method selection screen is the beginning of the journey. It’s where your user decides what payment method to use to make their deposit. But is this a conscious decision they are making? Wendy Wood, a researcher at Duke University, conducted a study where she found that as much as 45% of our daily decisions aren’t decisions at all — they’re habits. And as we know, it’s harder to change habits than to create them — this is particularly important when introducing a new and unfamiliar payment method.
Optimising the design of your payment method selection screen is crucial to pulling the user’s attention away from what they might be more familiar with, and guiding them to something else. It will be the main driver in increasing the number of users that choose open banking.
We won’t go into too much detail here, as we’ve already covered this in our guide to increasing open banking adoption. But the key factors that affect your user are:
a. ⏱️ Convenience: will this take long?
b. 💎 Clarity: what exactly do I need to do?
c. 👐 Familiarity: have I done this before?
d. 🔒 Security: is this safe?
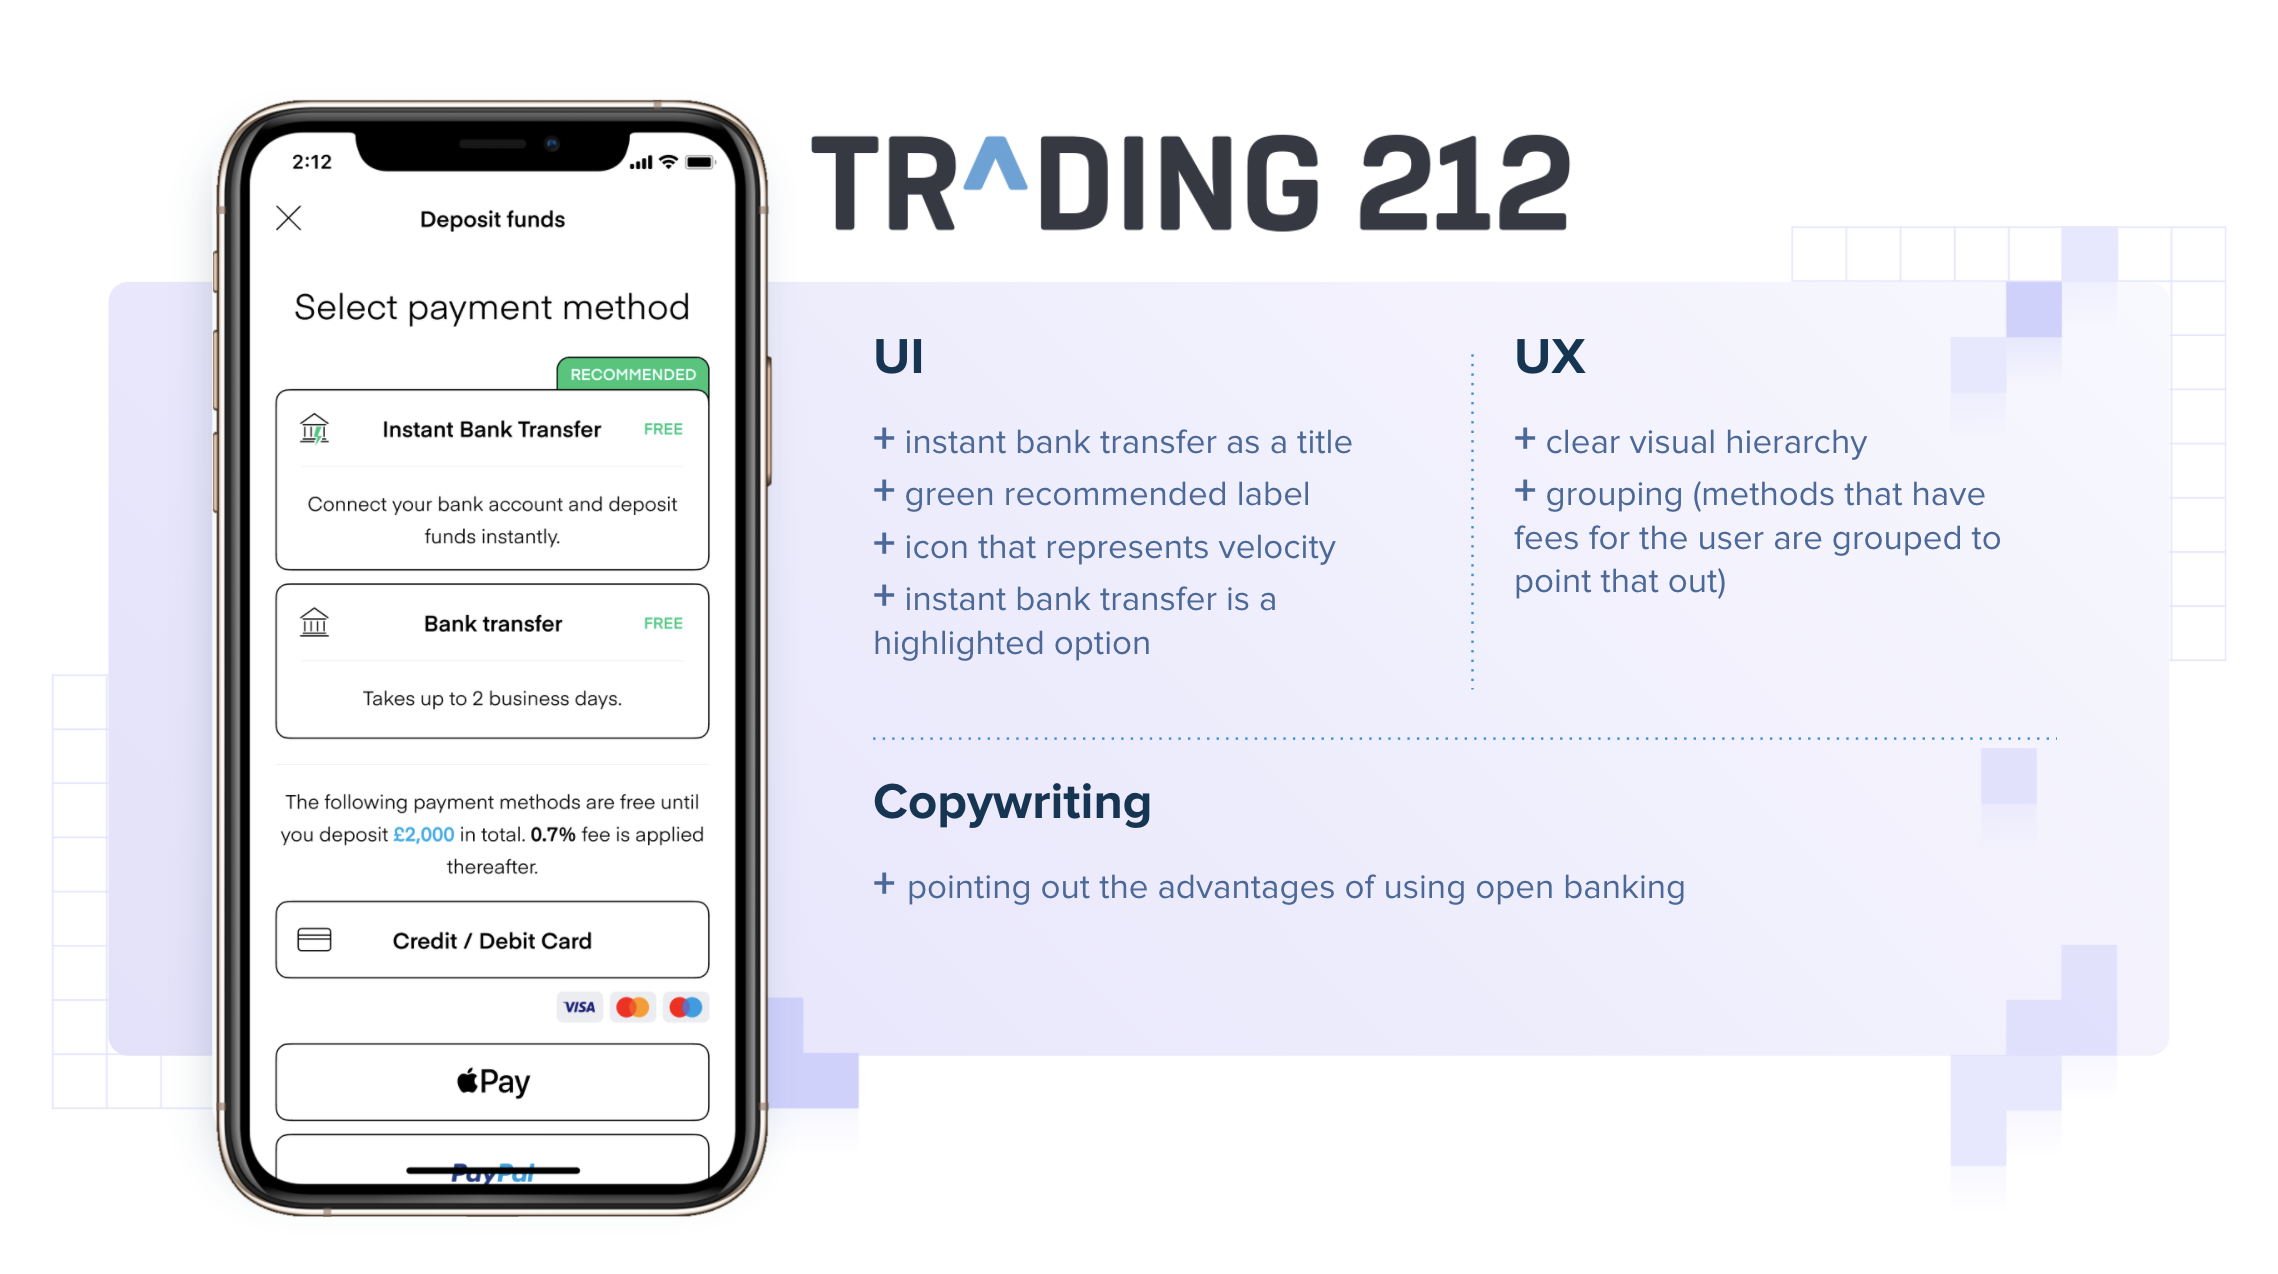
Trading 212, one of our wealthtech clients, has followed our recommendations to incredible effect as you can see below. In the last two months they have seen a 16% increase in open banking adoption.

)
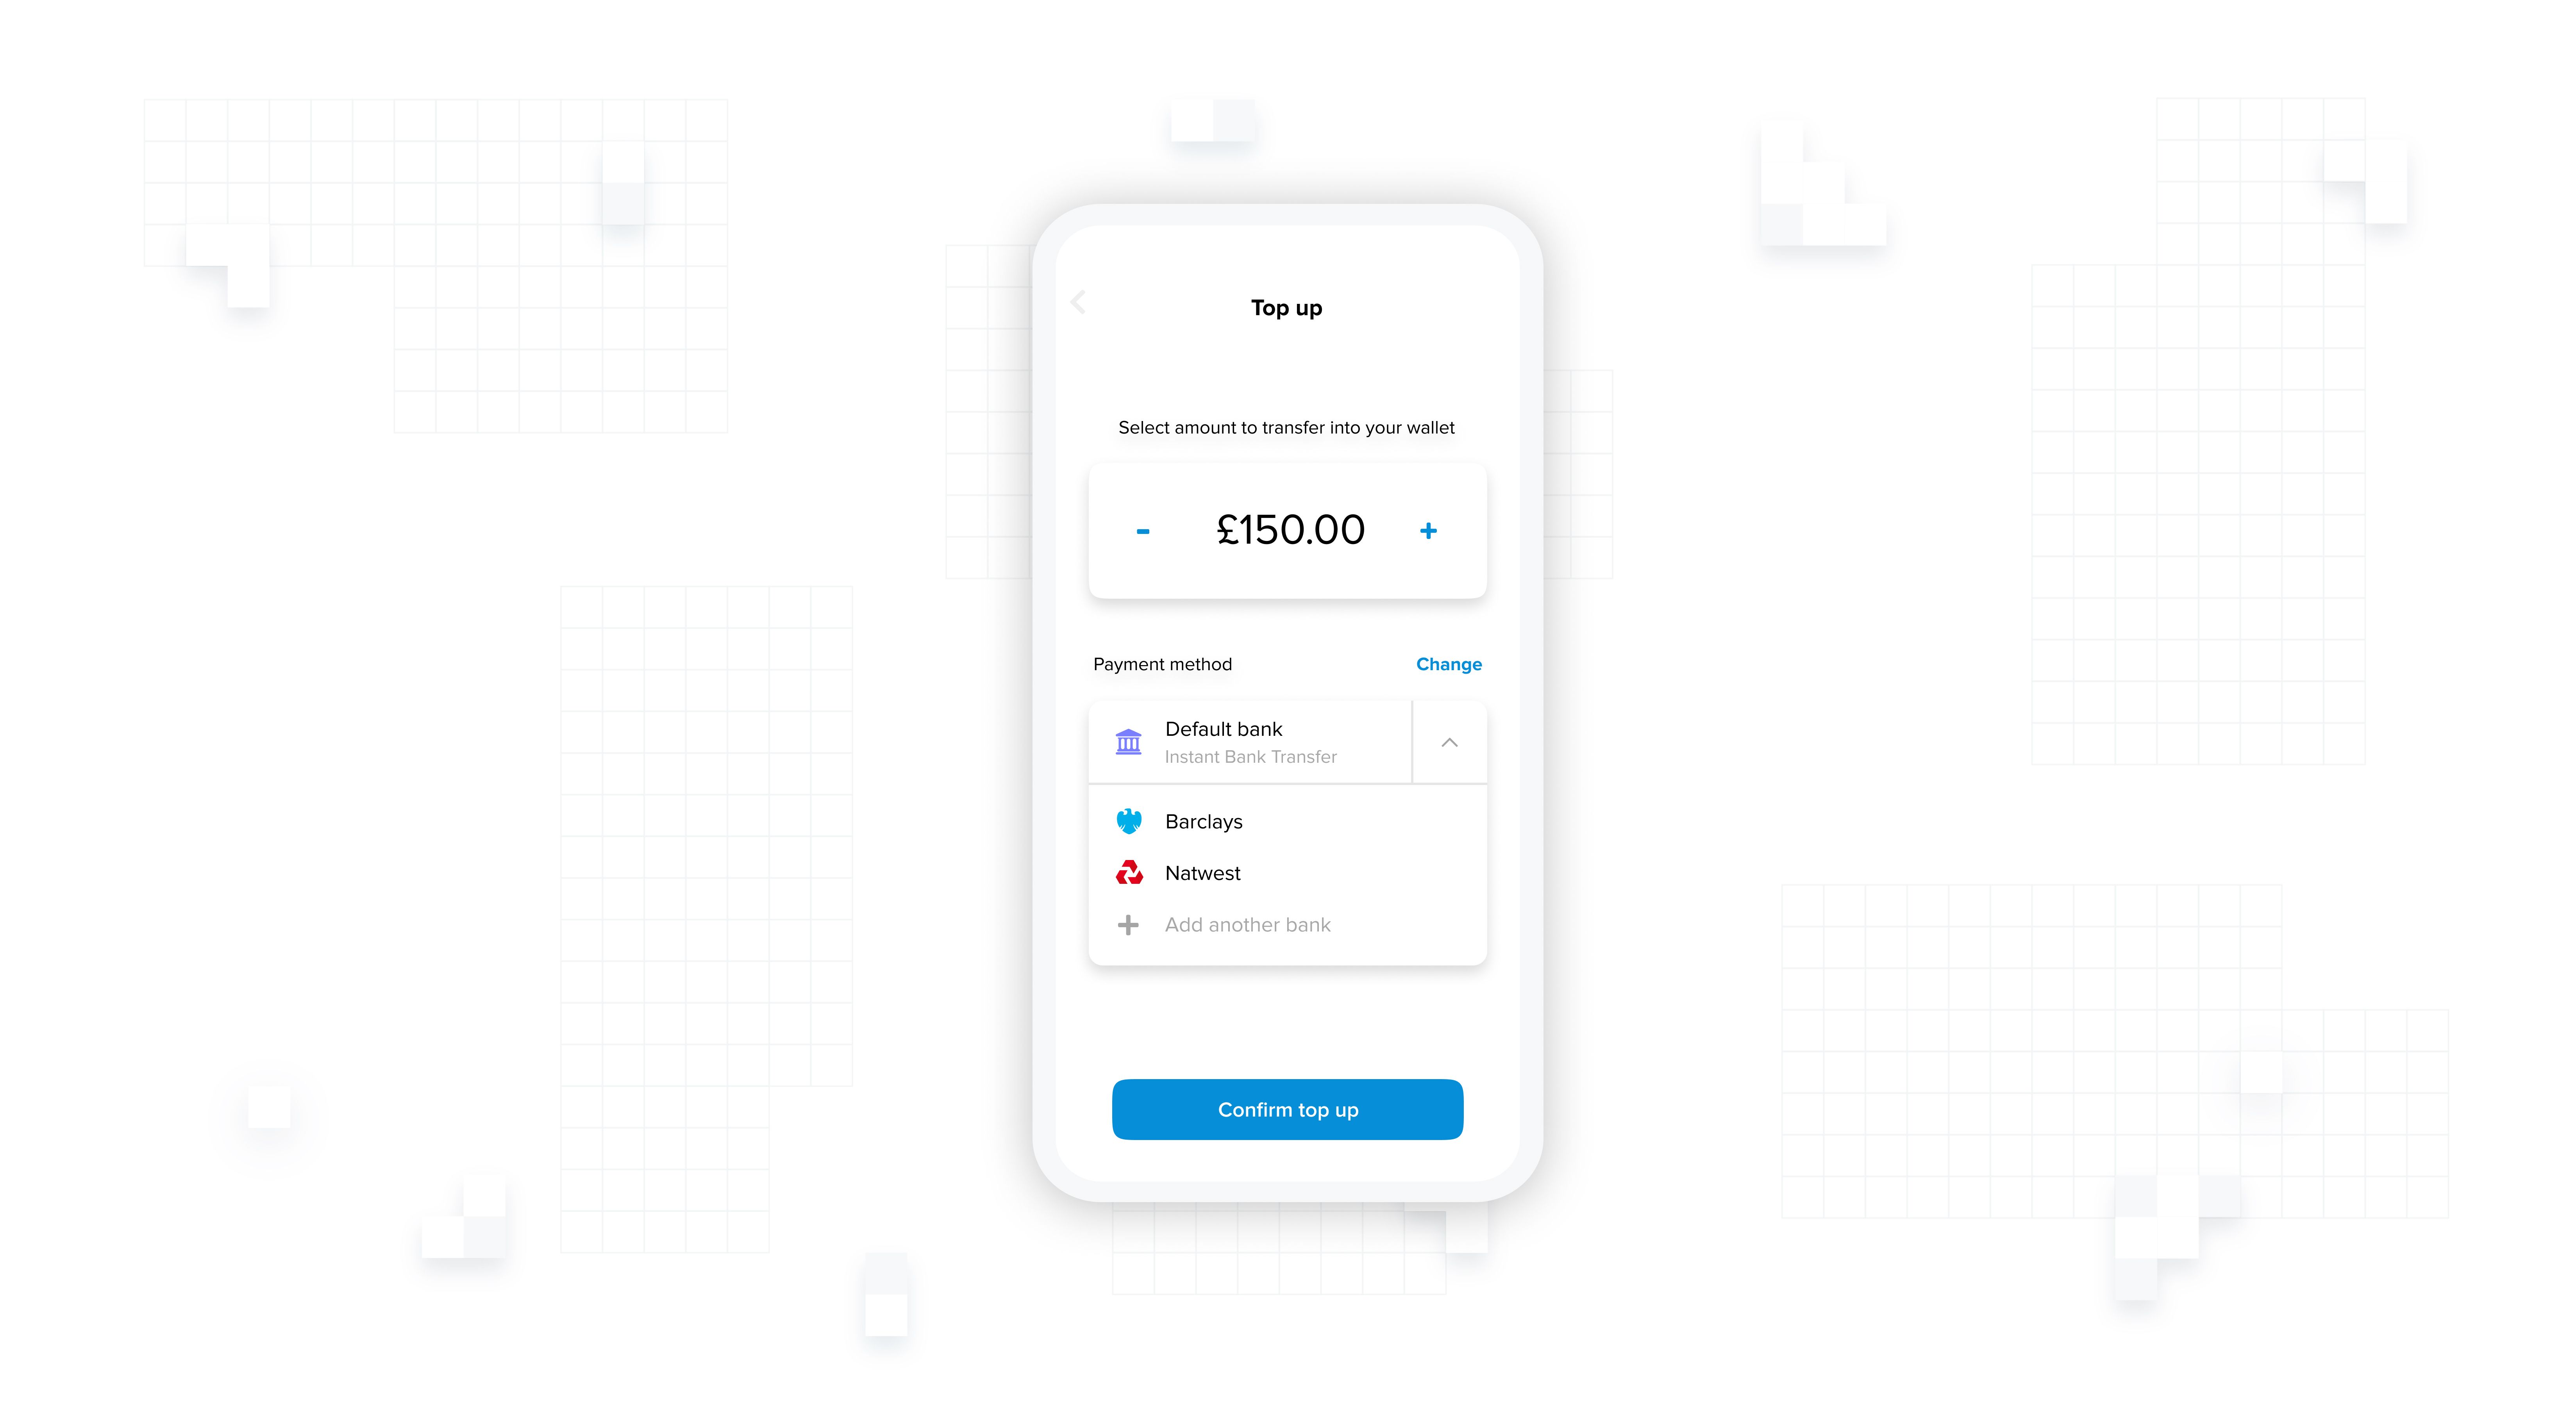
2. Amount selection screen
This is the second step of the flow: where your user chooses the amount that they want to deposit. In terms of the UI, there’s not much you can do with this screen, but its position in the flow is important.
By displaying your user’s selected payment method on the amount selection screen, you can set yourself up nicely for the returning user flow — where you can omit the select payment method screen altogether.
)
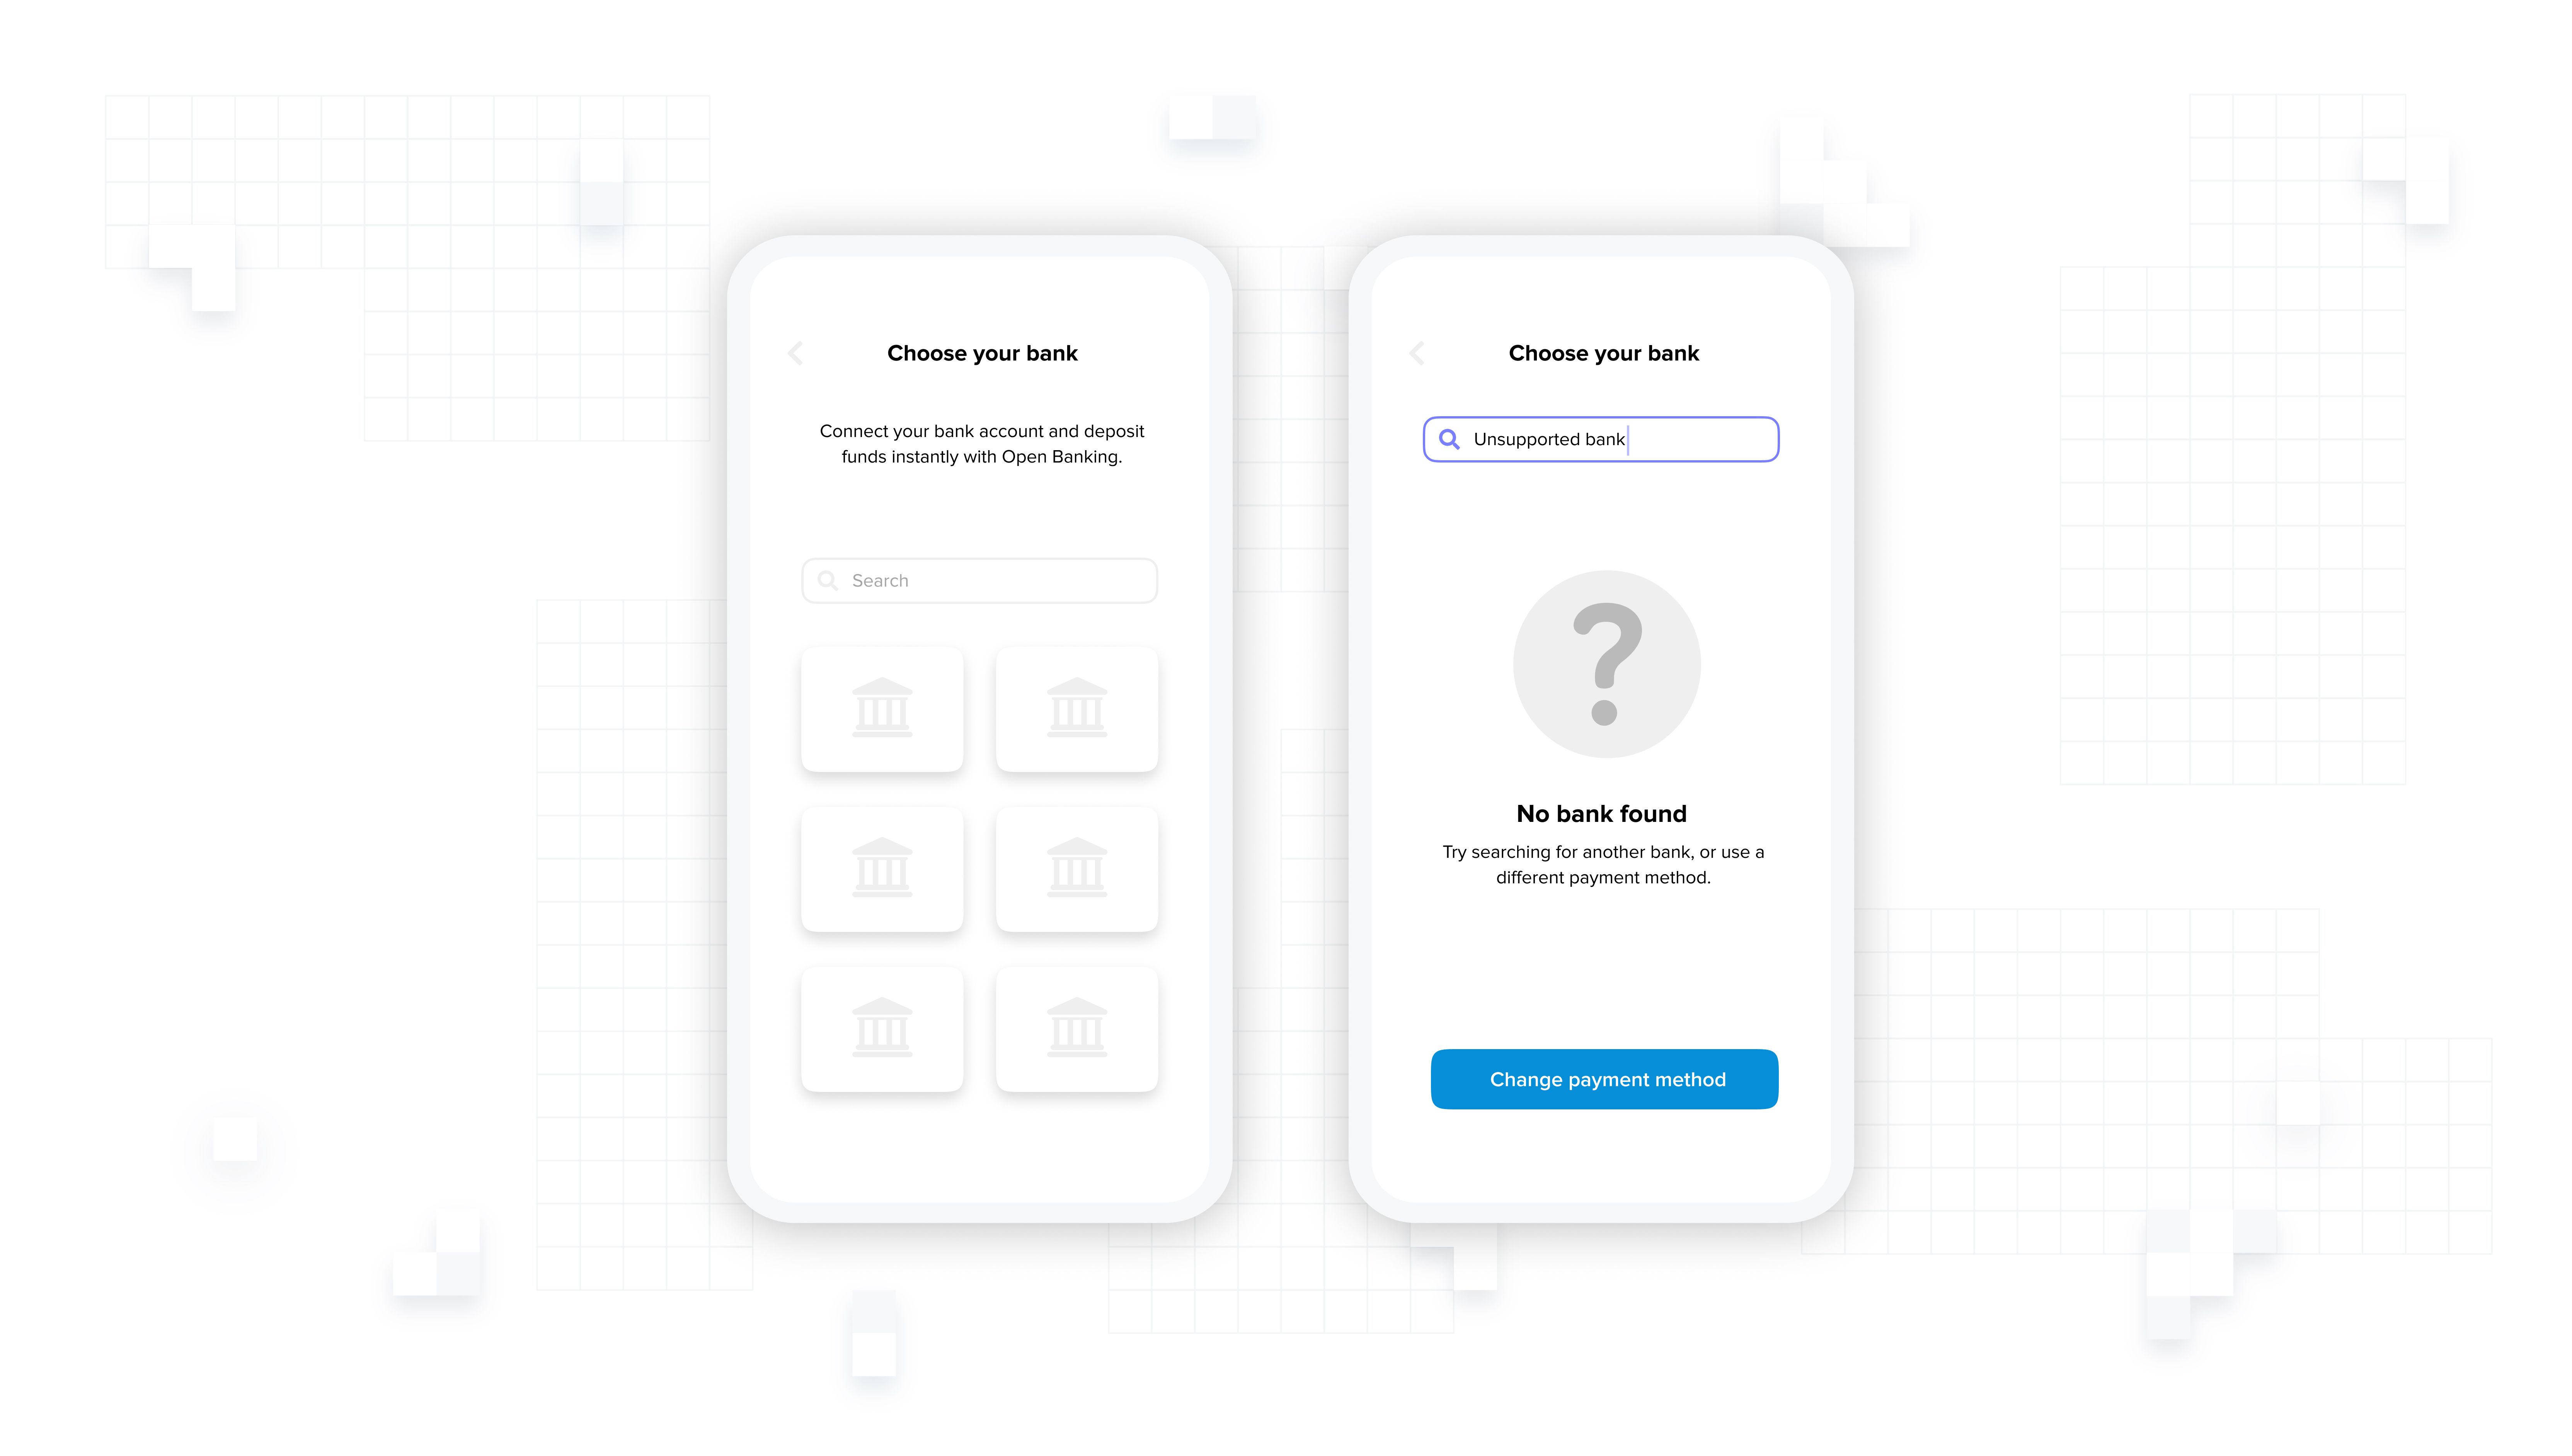
3. Bank selection screen
Following the amount selection screen, is the bank selection screen. If you are building this page on your own instead of using our ready made one, here are a couple of suggestions:
Include a search bar so that your users can quickly and easily find their bank. Don’t make them scroll through a long list of providers(!).
But what if a user can’t find their bank? With a payments coverage of 99% in the UK through TrueLayer that’s unlikely, but you should always design with edge cases in mind. Make sure you offer an alternative to the user. If you are reducing the number of choices in the payment method selection screen, this is the perfect place to use them as a fallback.
)
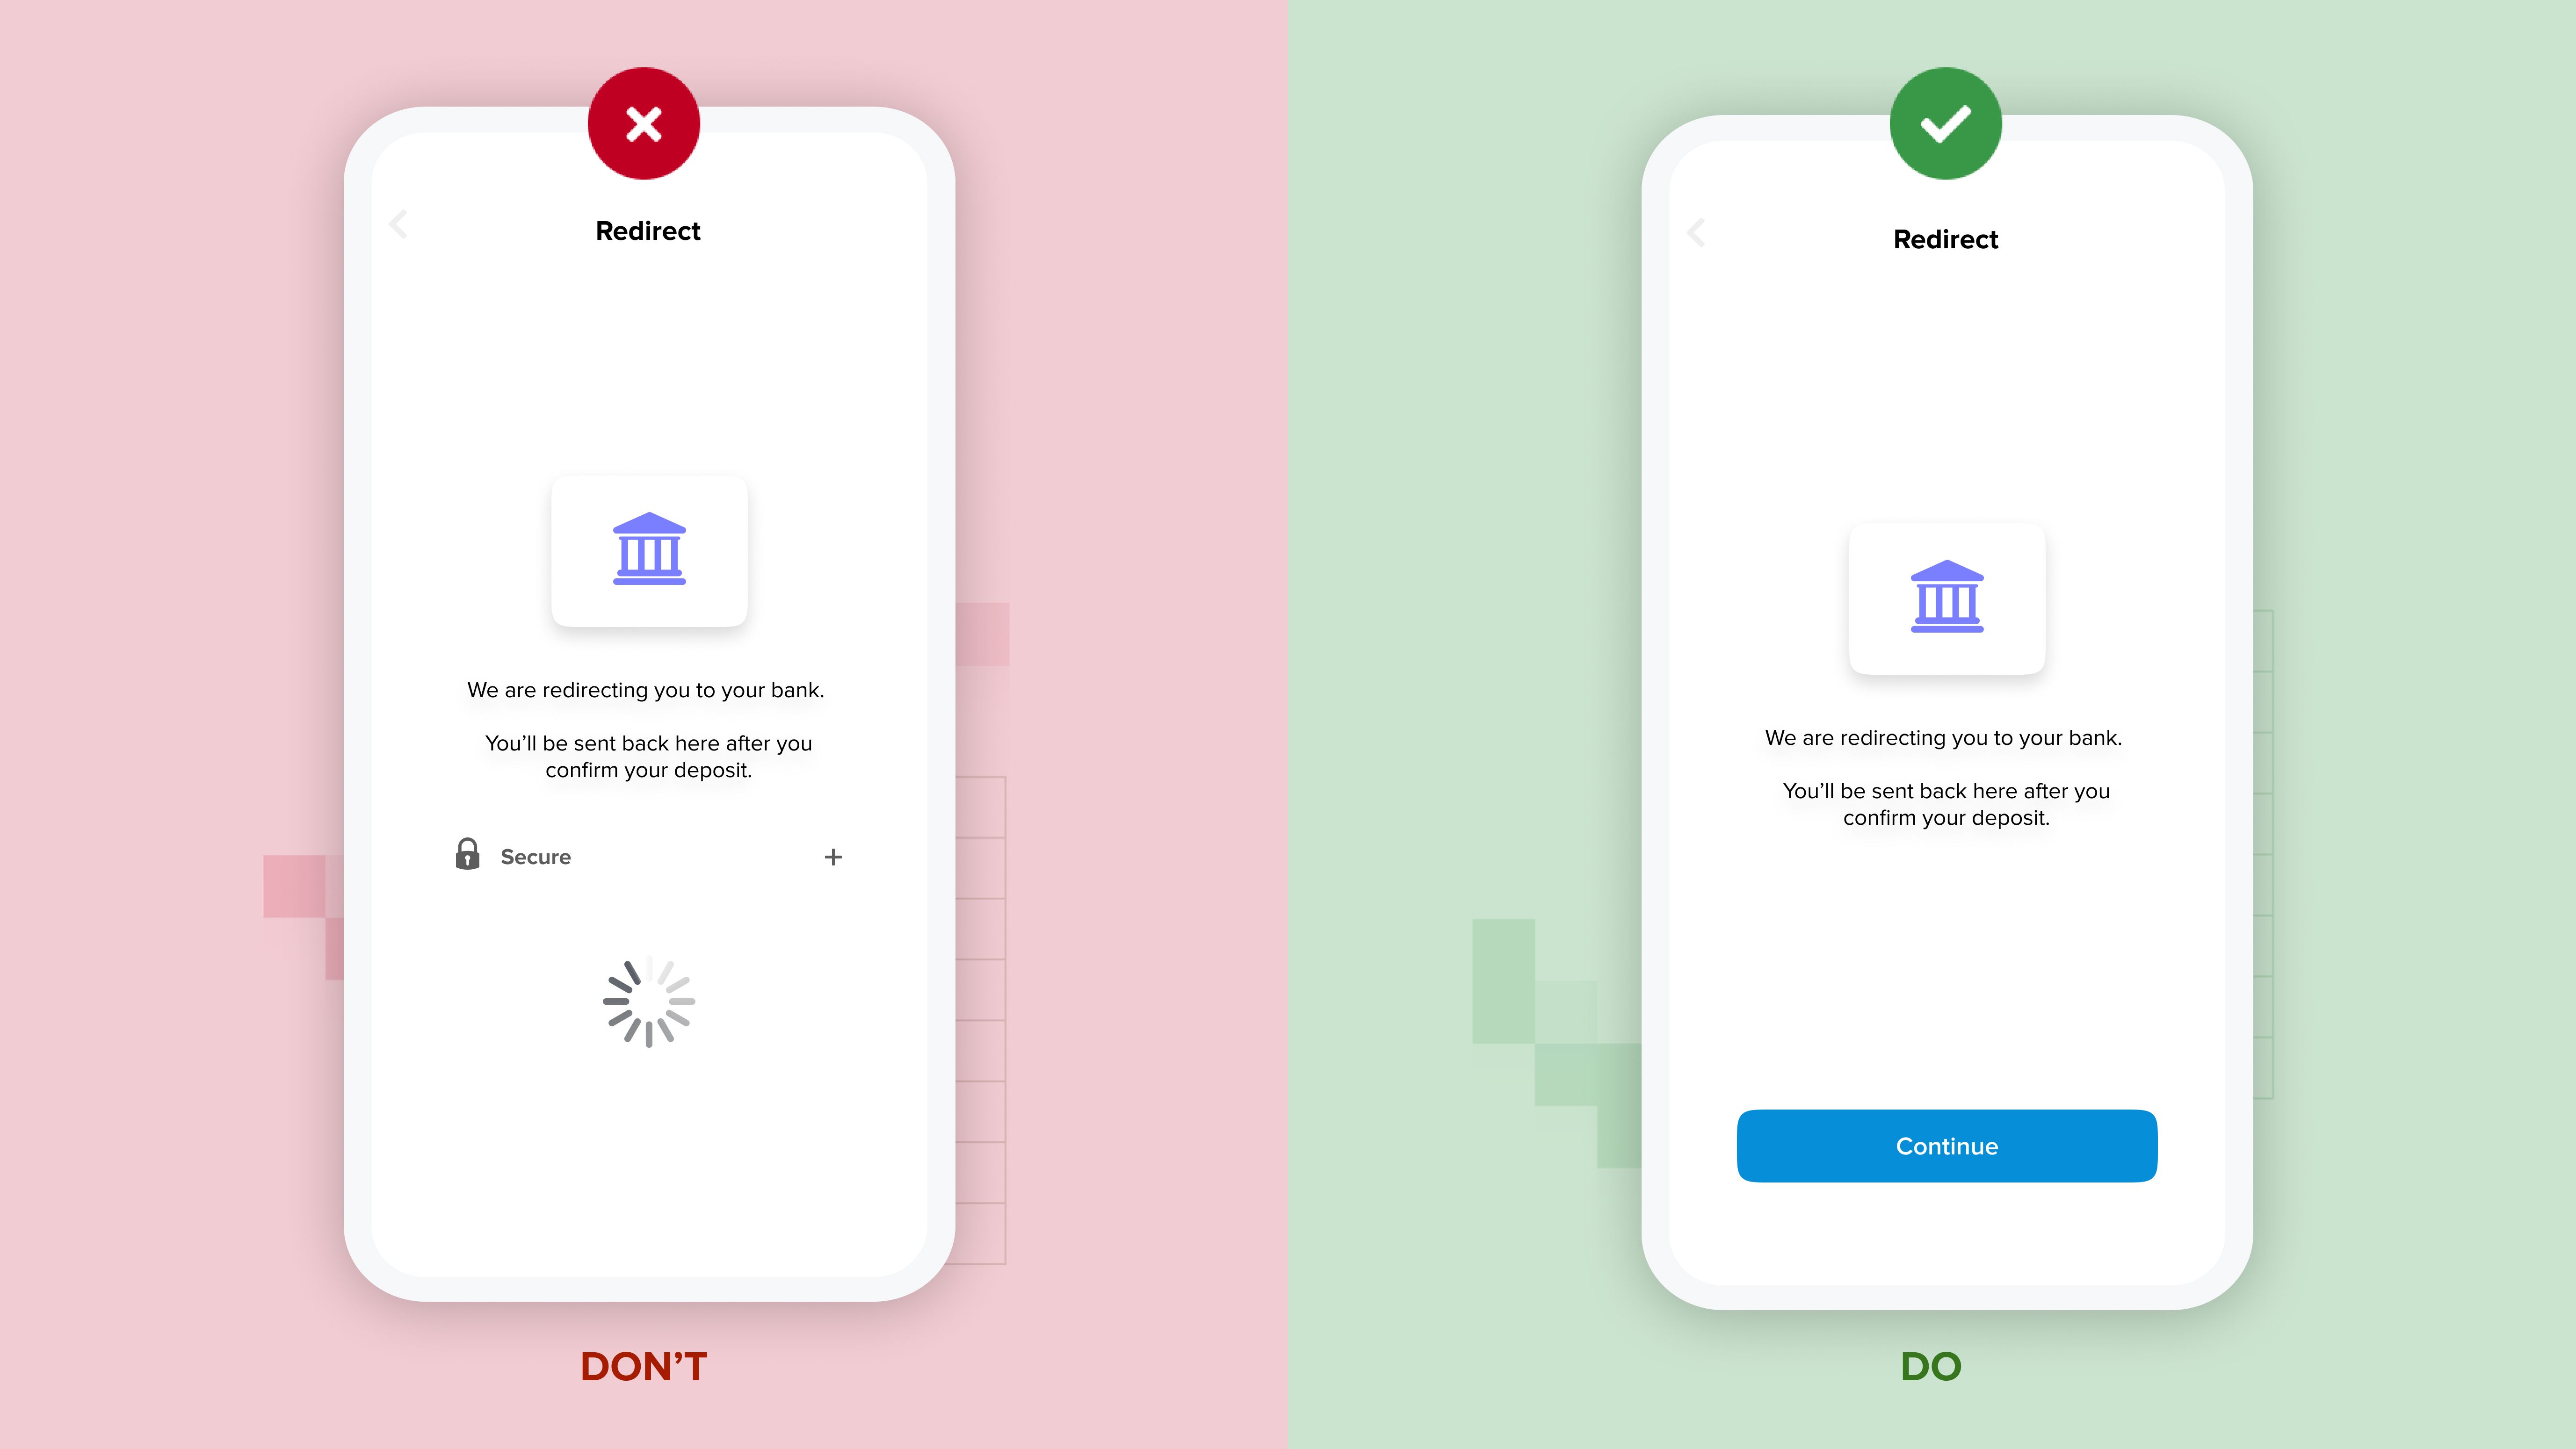
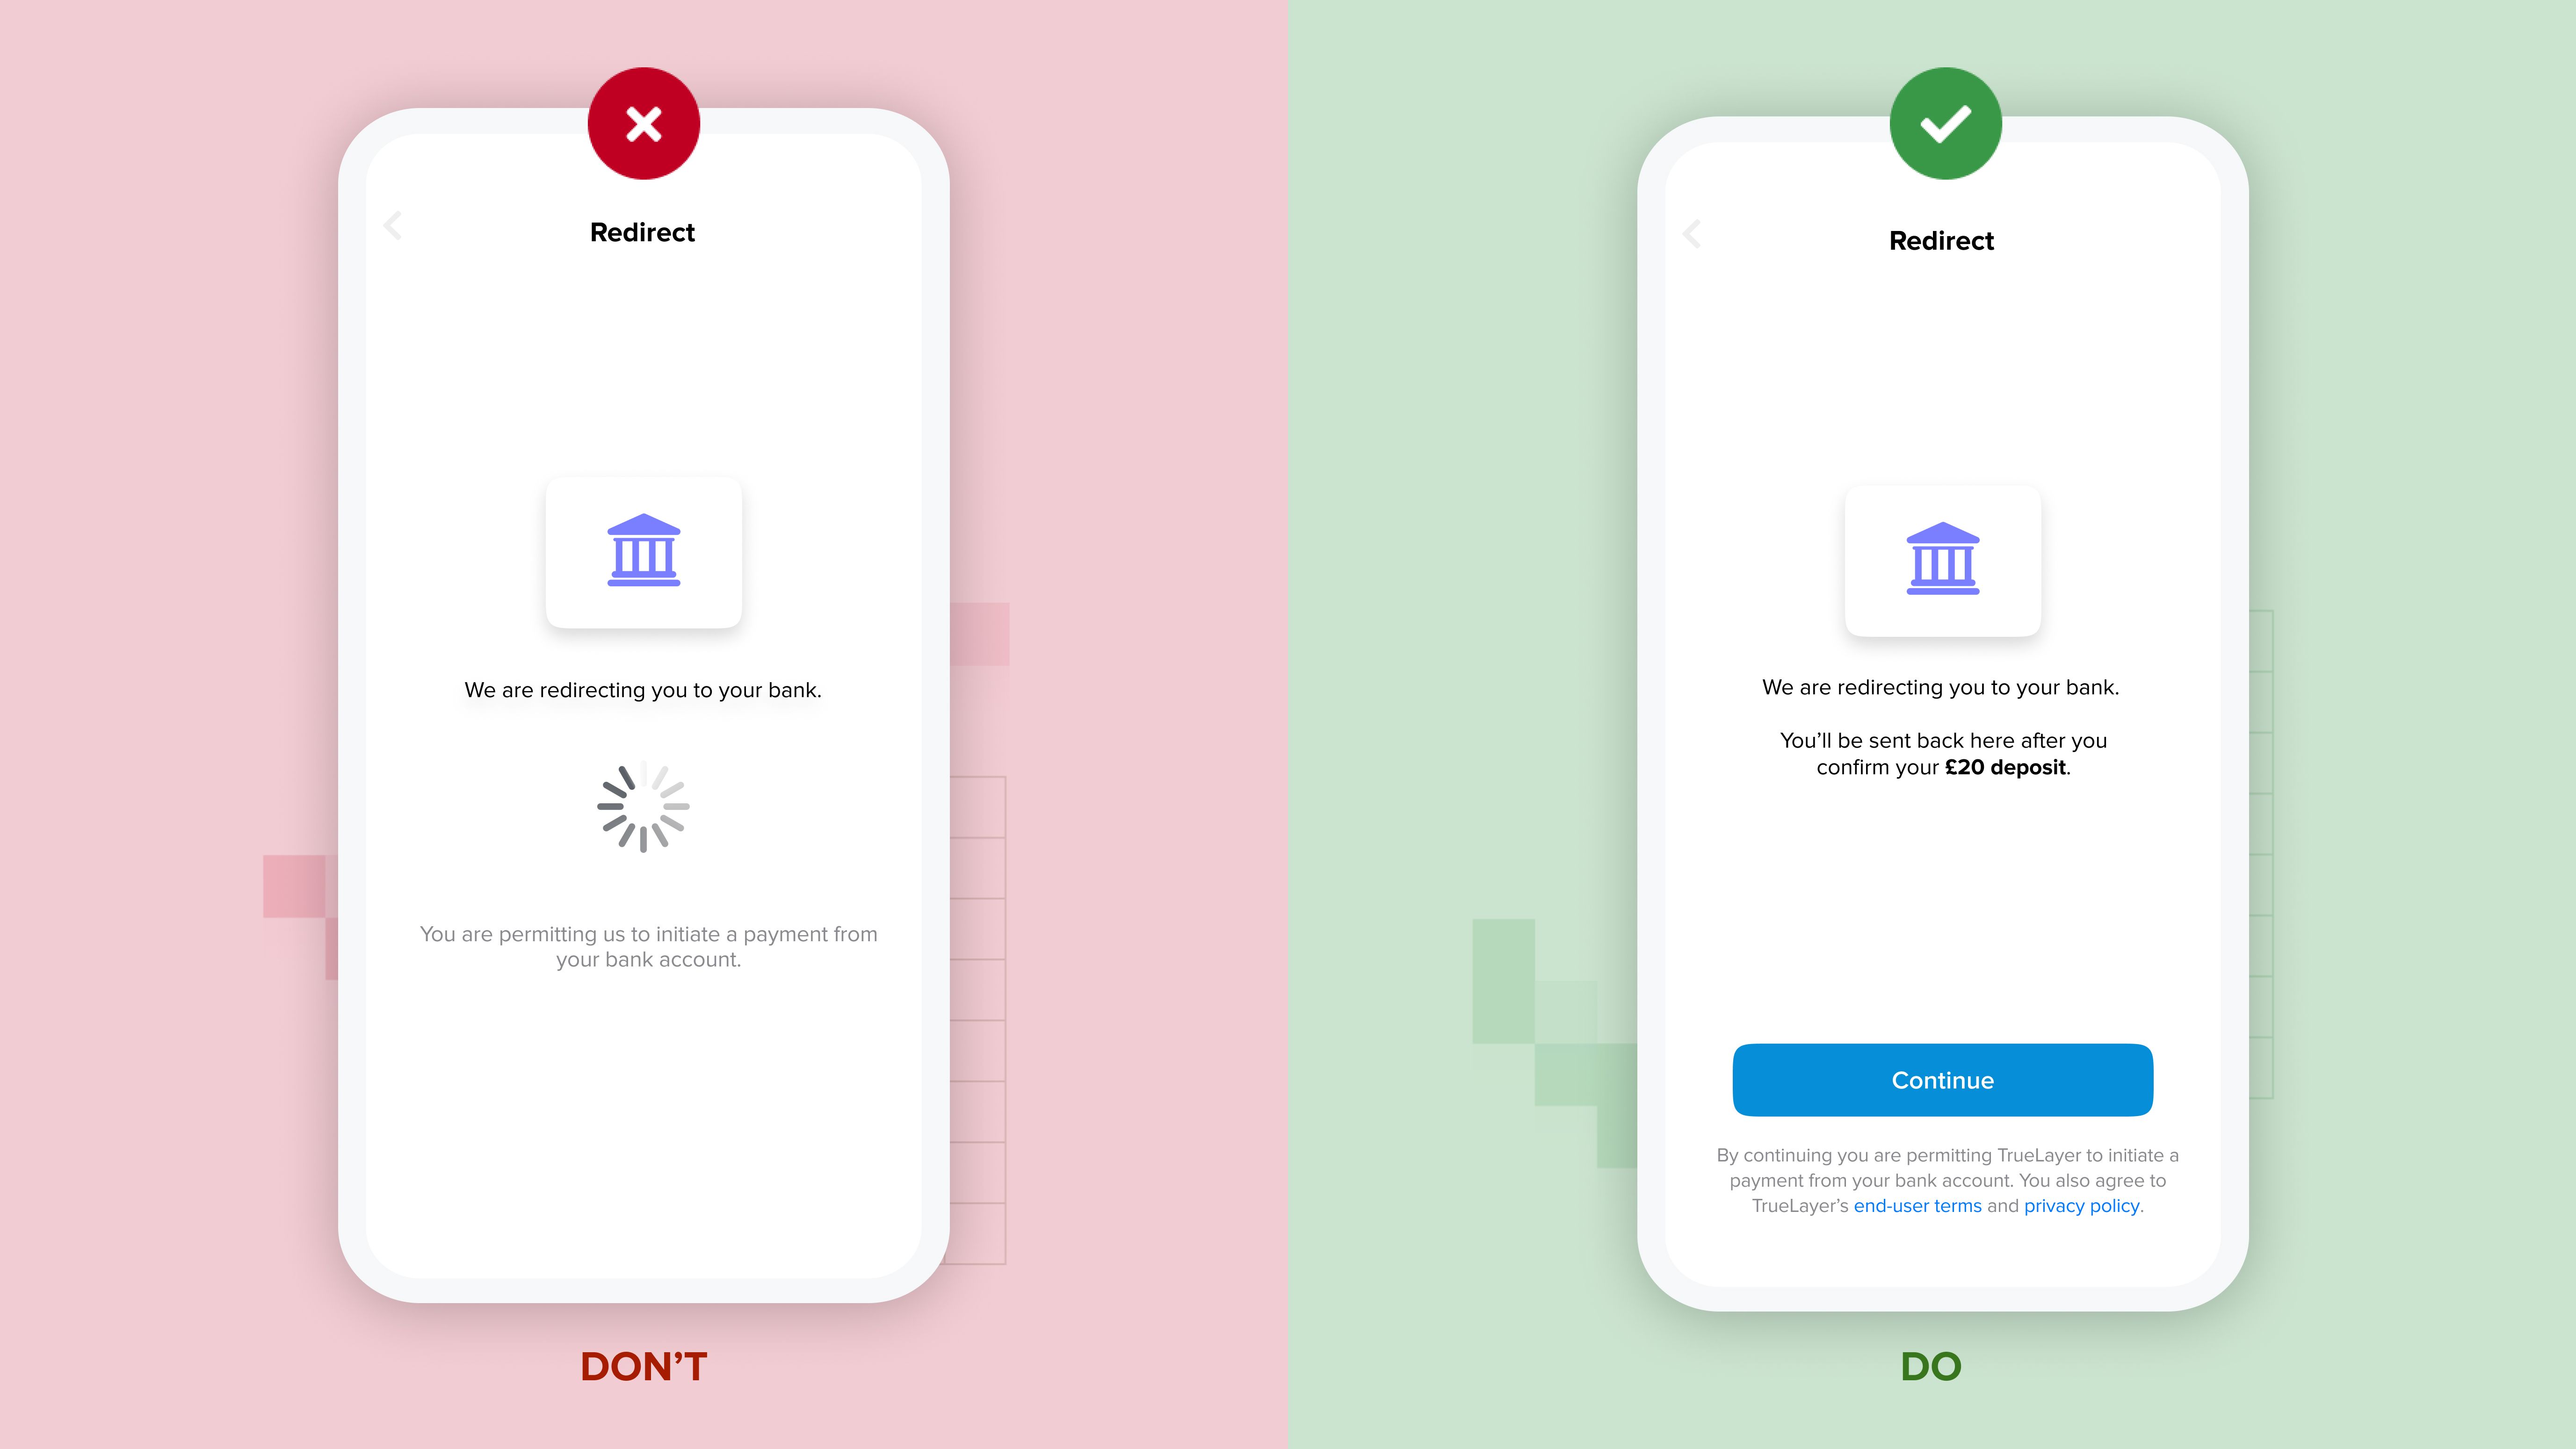
4. Redirect screen
Finally, here’s where we redirect your user to their bank. This action should be near-instant, so even a few seconds of loading time can be perceived as a bug by the user. Be prepared, and have an animated loading screen ready to cover any delay.
It is also good practice to warn users before you redirect them to third parties. In this case, before they are sent to their bank.
)

If you are using a loader to handle the redirect, this is a good opportunity to add positive friction to build trust and better help your user navigate their journey.
A simple message that explains what is happening next can really boost user confidence and positively influence completion rate:
“We are redirecting you to [BankName]. You’ll be sent back to [AppName] after you confirm your deposit.”
Depending on the context and the amount of additional information you want to provide, this step can include a timeout or require a user to click to continue. If you opt for the timeout approach, limit the copy to a short sentence so the user has enough time to read it.
If there is a lot more information you want to include, or you are using progressive disclosure, then add a button and let the user be in control of the time they want to spend on this screen.

)
Speaking of which, adding a click to continue at this step can be useful for a common issue our clients have encountered on iOS.
App2app redirecting on iOS
Using biometrics to authenticate deposits is much faster and provides a far better experience for your user. So ideally you want to redirect your user to their bank app rather than to a mobile browser. However, on iOS this isn’t always so simple.
iOS does not allow automated app2app redirects — it requires you to register user intent to do that. Luckily, including a click to continue within a redirect screen is enough to do so with just one more tap added to the overall process.
5. Success
And finally: the success screen! We won’t go into too much detail here, as we’ve already covered this in our guide on optimising the open banking user journey. But the key things to remember are:
Always notify the user when their action has been successful
Map all of the possible errors and provide meaningful feedback to the user when something goes wrong

)

Optimising for returning users
Now that we’ve covered the flow for first-time users, let’s explore the best practices for when they make their next deposits.
Returning users care about convenience. And if they have to go through the same flow multiple times, they expect to be able to skip certain screens. Providing good UX for returning users is really important — according to our clients they deposit 30% more on average than those using other payment methods.
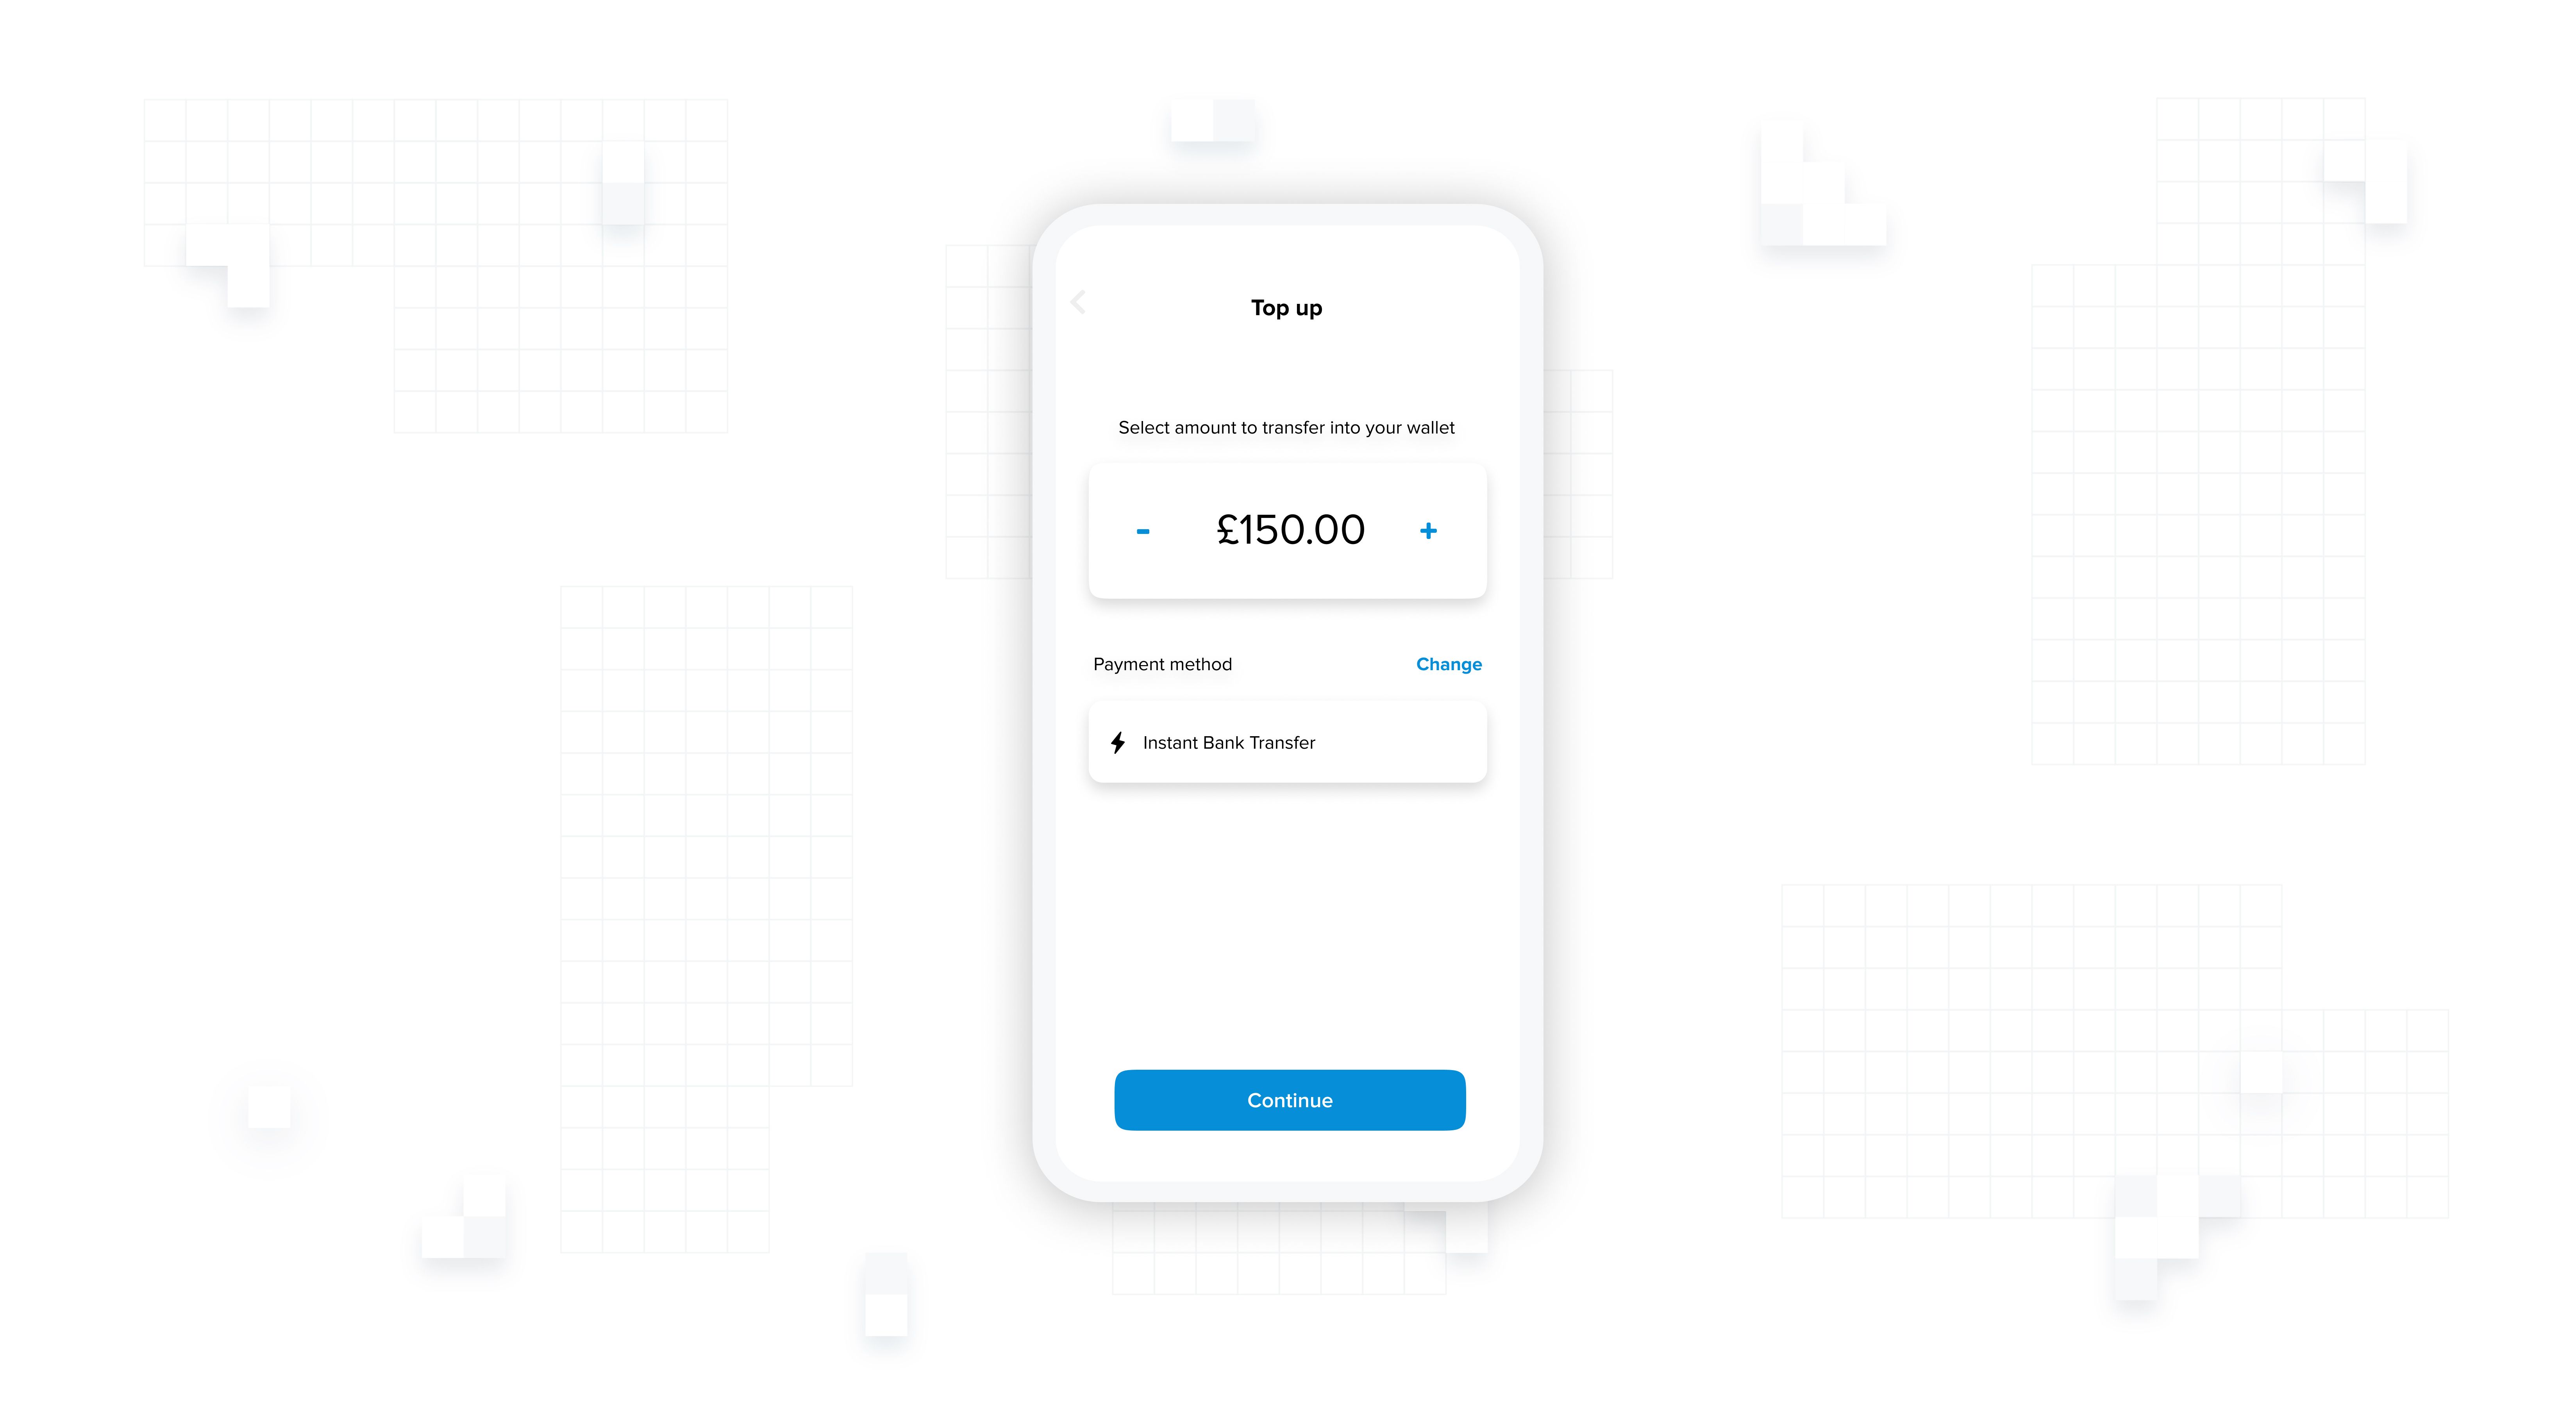
The main point is this: add shortcuts such as saving previous choices so that your user can deposit funds faster. Here’s an example of what an optimised returning user flow looks like:

)
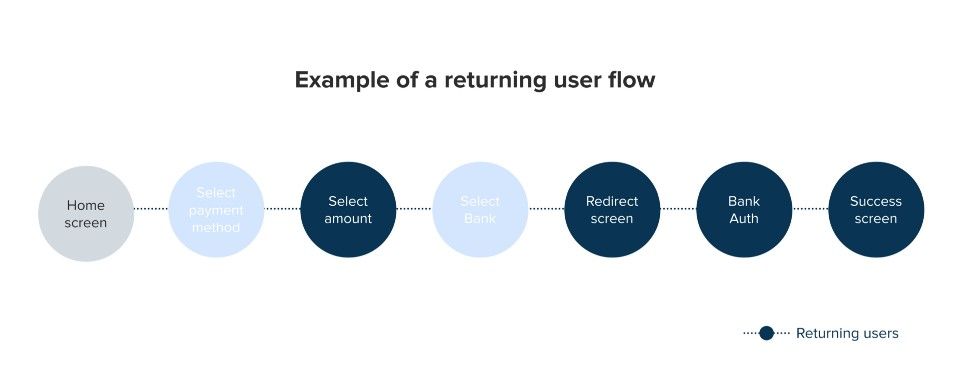
Remember previous choices
Remember your user’s last-used payment method and the banks they have previously made deposits with. This will allow you to omit the payment method selection and bank selection screens and present your user with a preselected option.
Clearly indicate what the selected method and bank is, and make sure there is an easily accessible way to change both — this should take the user back to a payment method selection screen or bank selection screen.
)
Keeping your flow compliant
If you are not regulated for payment initiation services under PSD2 in the UK or EU, you must display the following information to the user before every payment is initiated:
By continuing you are permitting TrueLayer to initiate a payment from your bank account. You also agree to TrueLayer’s end user terms and privacy policy.
The regulator requires you to:
use the provided text without any changes to it
display the text to the user before they are redirected to their bank
include links to TrueLayer’s privacy policy and end user terms
make sure the amount of the deposit is clearly visible on the screen
require a user to click to continue
That said, you do have options. Depending on your use case and implementation, there are a few places you could place this information.
A common example we have seen work well is to add it to the bottom of the amount selection screen.
)

If you are using a positive friction screen before redirecting to the user’s bank, or are following our app2app advice, you can also display the information there (as long as you follow the regulator’s requirements).
)
Conclusion
All said and done, what will any of this actually mean for your conversion rates?
Clients who have followed this advice have seen an immediate increase of up to 15% in open banking adoption and 10% in overall conversion. They also achieve an average adoption rate of 30% in the first three months after going live.
We know this number can reach 80% and we are determined to help you get there, so stay tuned for more advice on our best UX/UI practices to follow soon.
Checklist
- use a label like 'instant bank transfer' that users will immediately understand
- use an icon that represents velocity
- use a 'recommended' label — green is usually associated with positive outcomes
- have 'instant bank transfer' as a highlighted or preselected option
- point out open banking advantages eg faster settlement or no fees
- reduce options on payment selection screen — use other methods as a fallback
- use grouping principle (do other deposit methods come with fees? group them and point it out)
- use positive friction to give context to the users before they are redirected to their bank
- display 'select amount' screen after 'select payment method' screen
- check you are displaying all necessary compliance info
- optimise the flow based on user type: first time vs returning
- use shortcuts for returning users eg preferred bank
- capture user intent if you are using app2app on iOS
- always provide highly visible and accessible options for users to change their selection
)

TrueLayer part of FCA's Supercharged Sandbox to test agentic payments
)
Payment choice, not cards by default: the view on agentic payments
)
